

Test Firing the Bait Launcher
Here’s the results of the first few times we took the bait launcher to the beach. Overall it performed as well or better than expected. We did run into a few bugs which I ended up fixing. One key thing we accomplished is that we dialed in the right pressures to fire the bait cannon at. I’m still working on angles and compensating for wind. Overall, the distance you can launch a bait plug is pretty amazing!
I had a lot of fun putting this together.
You can read the Article on building the Cannon here “How to Build a Bait Cannon or Spud Gun“. An added plus is the design allows me to change barrels on this. So you can expect a few articles on launching lemons, tennis balls and complete and utter destruction of melons and wooden boards. I’ve already shot a 1.5″ ice ball completely through a 5/8” OSB board while test firing!
Powering up the Bait Bauncher

I was lucky enough to pick up a Slime Pro-Series Super Duty Tire Inflator at a local pawn shop for $25. An amazing price considering it was practically new and generally retail for about $100. I was using this to inflate my tires after a beach trip (we air them down for easy traveling on the loose sand). This was perfect for the bait cannon and provides enough compressed air to fill up the air cylinder on the bait cannon in a few minutes. (Pic on left is an affiliate link)
I’ll probably upgrade to a mini portable air compressor with a tank. My Tacoma has a 400 watt outlet that can power one of those. Upgrading to a bigger compressor will give me quicker reload times as well as let me inflate my tires quicker after we’re done.
First Beach Test Shots of the Bait Launcher
We took the bait cannon out to the beach in early July and gave it some test shots. We quickly found out that anything over 100 PSI was risky to the line coming off the pole. Shots at this pressure range snapped the line roughly 50% of the time. I was using 20# test and had about 30 feet of 50# test as a shock leader. We reduced the operating pressure of the bait launcher to 95 PSI. The lines all survived the shots at this pressure.
Fixing the bugs on the Bait Launcher
The next thing we found was that the recoil from the shot would knock the cannon off it’s stand and knock the wood support out. I cam up with a fix for this. I added a 3″ piece of 2″ PVC to the mounting point. After that, I drilled a hole through the mount and used a tractor clevis hitch to secure it in place. This allows me to disassemble the stand for transport and storage but gives me a secure connection when using the bait cannon.
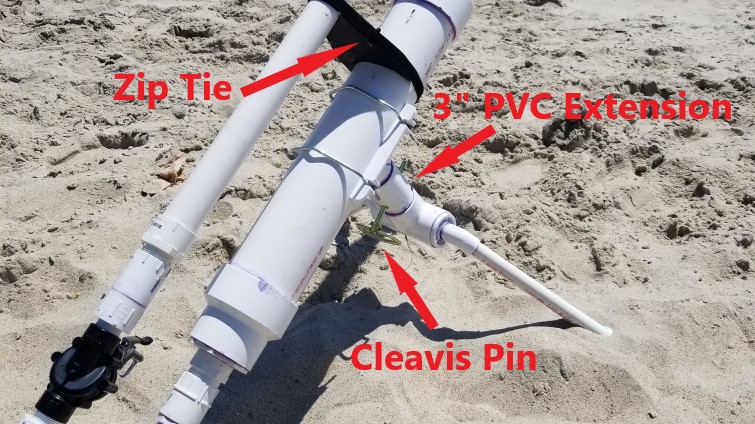
As far as the wooden brace, I drilled two holes along the side of it and then secured it with tie wraps. I secured the tie wraps through the block and around the velcro. This locked everything in place quite nicely. I also made sure to leave the open ends of the velcro on top. This will allow me to change barrels easily.
Second Beach Trip Test Shots

Before we headed to the beach, we replaced the shock leader with about 50 feet of 50# test. My idea was that the longer shock leader would take up most of the initial stress from firing the bait cannon. Hopefully, this would spare the 20# test in future shots! On this beach trip, we managed to get quite a few nice shots. This is where we got some experience with elevation making a crucial difference. We quickly learned that a high angle of elevation led to some long arcing shots.
Quite frankly, I think these ere the longest shots. If you look at the picture, towards the middle left side you can see the bait slug (still attached to line on the pole) just before it disappears from sight.
Dealing with Cross Winds
We also learned that when you have cross winds, high elevation shots work against you. Apparently the wind will pull the line in whichever direction it is blowing and pull the slug along with it even after it enters the water. So we also tried some low elevation test shots. We did these at lower pressure. The idea being that keeping the distance short and the elevation low would keep the wind from moving the line and bait slug from it’s intended target. These worked extremely well too!

You can see in this picture where the slug made it’s entry into the water. Although the distance was not as far as the high arcing shots, it was still decent and allowed us to control where we wanted to put the bait.
Conclusion
The beach testing proved that the bait cannon was an incredible success! We learned a lot from these trips. Wind and current need to be taken into account. They will determine how much pressure and what elevation you launch at. We’ll definitely be taking more surf fishing trips this year, you can be sure we’ll be bringing the bait launcher along with us!
Update on the Air Compressor
I have since updated my compressed air source to a small compressor from Harbor Freights Central Pneumatic line. This let me store some compressed air so that filling the bait cannon tires is much quicker. It is rates at 1/3 HP which is well within the means of the 400W inverter in my Tacoma. Link on left is an affiliate link.
You can watch the YouTube version of this article here:

