Make Your Own Spark Plug Wires DIY

Making Your Own Spark Plug Wires

Building your own spark plug wires is a simple yet rewarding task. They are not complex to build and do not require advanced skills. If you have worked with wire strippers and crimpers you can easily build your own spark plug wires. In this post I’ll be describing the materials and tools available for building custom wires. I’ll also go over the build process step by step using the MSD mini crimp strip tool. I’ll be building these wires for an outboard motor but the principles I cover here apply to any engine that requires spark plug wires.

Why Build Your Own Spark Plug Wires

There can be any number of reason to build your own plug wires. Custom lengths being one of the key ones. Customizing the terminals and boots being used are certainly another. Yet another reason is that you can orient the terminals to face your engine correctly. When you combine all of the above reason, you can put together a highly customized set of high performance plug wires. Even if you’re not building a race engine, there’s no reason you shouldn’t. Personally, I love horsepower, I also love the look of a “Groomed” engine. There’s something to an engine with neatly laid out wires on a loom that speaks volumes to the care that went and goes into that engine.

Why Replace your Wires?

Some may ask why replace wires anyway. Wires can become frayed with age. Fraying or even small cracks in the insulation of a spark plug wire can cause minute (or large) leakage to ground. Resulting in a weak spark, which may affect the performance of an engine. There is a fallacy that high performance wires can add horsepower. It is just that, high performance wires wont give you any more power than an ordinary set. They will however, insure that you are getting the energy to your spark plug that your engine requires. In my case, the wires in the Johnson 40hp that I’m refurbishing were old, I mean really old. I was convinced when I saw that one wire was wrapped in duct tape. I needed no more that to invest in new wires.

The Components Needed to Build Your Own Spark Plug Wires

Spark Plug Wire

Spark plug wires come in a great variety of compositions and widths. An entire article can be written on the differences in Spark plug wires. The composition of wires range from solid core for high performance vehicles to spiral wound conductors for modern vehicles where electro-magnetic interference (EMI) can be a problem for engine control modules and god forbid, the radio. One important aspect of wires for this application is resistance. Carbon core wires are used by OEM car makers as a way of reducing EMI. They do, however, present higher resistance. This translates into less energy being delivered to the spark plug. A more expensive option is the spiral wound core, which has low resistance yet provides excellent EMI protection.

MSD Super Conductor Wires

MSD has taken this to a new level with their high performance 8.5m wire (MSD Super Conductor) This wire has a carbon core and a Helically wound copper alloy conductor around the outside of the core. the carbon core acts as a choke. This blocks EMI, the wound copper alloy has very low resistance per foot, delivering the maximum power to your spark plug, They are my wires of choice and I will be using them for this project. For more info on MSD wires, check their website here MSD 8.5mm Super Conductor

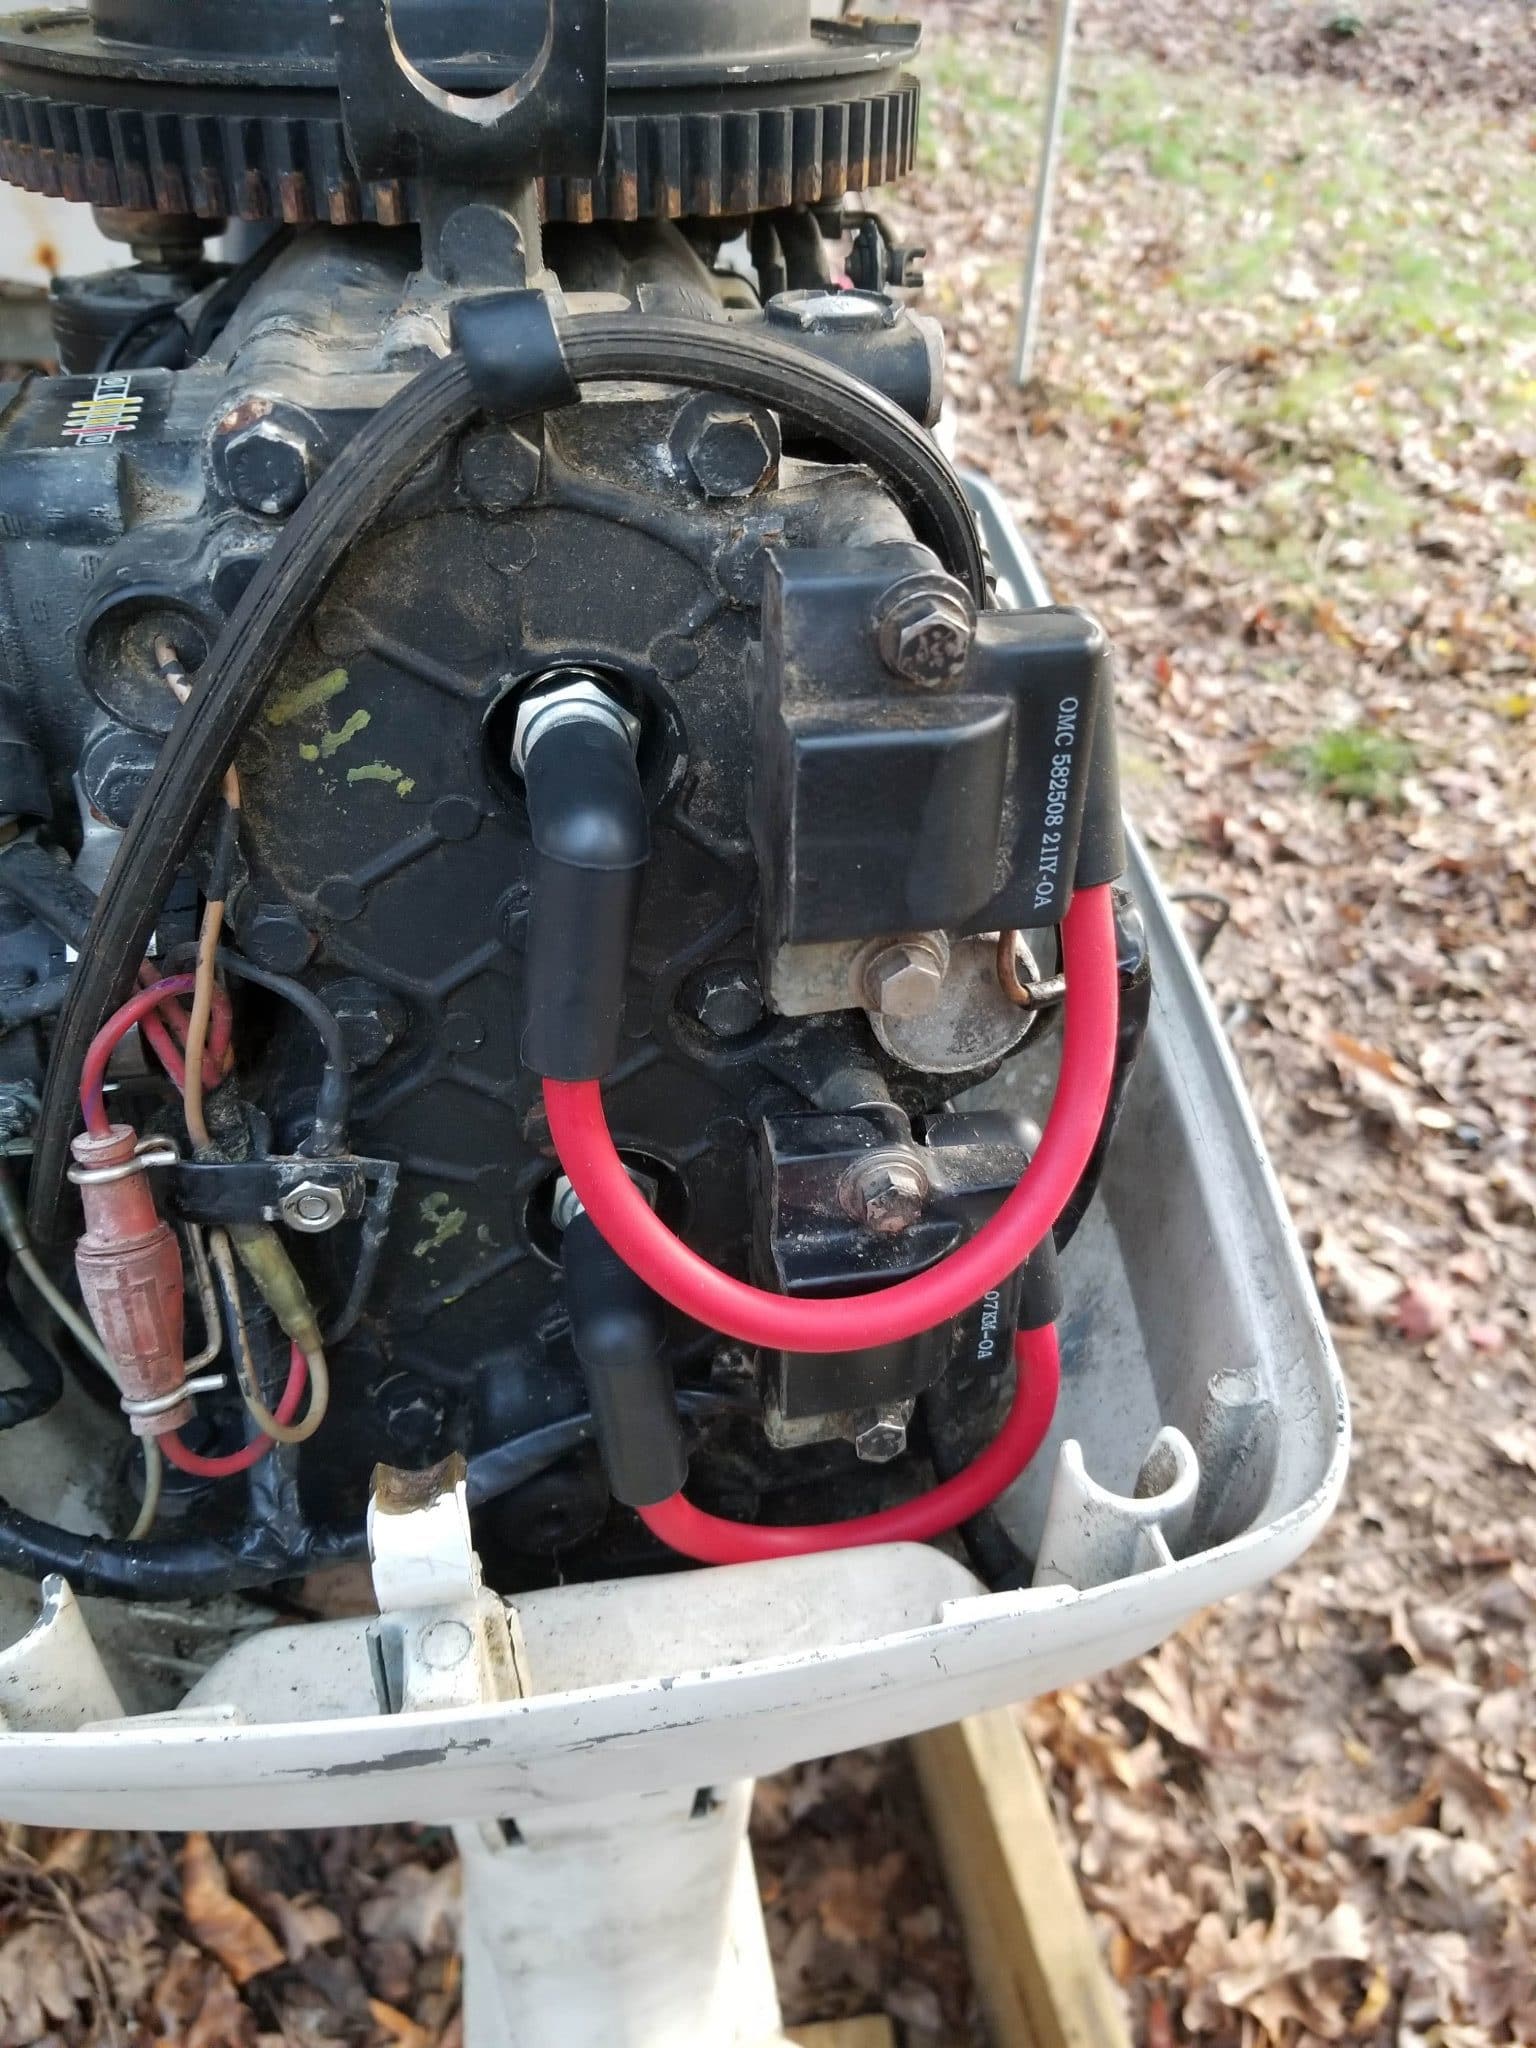
Spark Plug Terminals and Boots

Spark plug terminal come in a variety of shapes, sizes and angles. There are a lot of options that are available to highly customize your engine project. This is one of the benefits of making your own spark plug wires. Look for terminal ends that are made of stainless steel (I believe most of them are). Also look for a strong spring clip on them. The spring clip holds them on to the tip of the spark plug. It is important that the terminal have good retention capabilities. The clips I selected are short and are designed for right angle applications.

Boots on the market today are made of EDPM rubber or Silicone. They should be rated for high temperatures and should be resistant to oils and gasoline. Both of these materials meet that requirement. Spark plug boots also come in a wide variety of shapes, sizes and angles. Again, this gives yo a great deal of flexibility in how you build out the wire set. Being that this set I am making is for an outboard, shorter boots are in order dues to the limited space under the cowling. In my case, I used shorter boots that are formed at a right angle, which match the plug terminal clips I am using. The set of terminals and boots I am using are from Taylor and feature a high temp silicone boot.

Tools for Building Spark Plug Wires

There are a number of crimpers available to crimp spark plug wire ends. The two key types available are the ratcheting and the plier type crimping tools. The plier types are mid range, in price typically in the $20-$30 range. These pliers use simple hand leverage The ratcheting types are more expensive, typically starting at $50.00 and up. If I were making a selection between the two, I would go with the ratcheting style crimping tool. This is especially true if you plan on making multiple sets of wires. The higher end of the ratcheting pliers have detachable dies for different wire sizes and built in strippers for the same.

For this project I elected to go with a third type. I will be using an MSD mini wire stripper and crimper built specifically for 8.5mm wire. They are significantly less expensive than the other types of wire crimping tools. They will however, make an excellent crimp since they require the use of a vice in the final crimping process. I don’t have any immediate plans to make large quantities of spark plug wires so this smaller tool should do the job.

Building Your Own Spark Plug Wires

Stripping the Wire

Spark Plug Wires Cutting Spark Plug Wire
Cutting Spark Plug Wire

First, measure out the exact length you need for each of your wires. For my project it was relatively easy as there were only two wires. You need to take into account the amount of wire that will be stripped as well as the length of the terminal you will be using once it’s crimped on. I added 3/4″ on each end to allow for what would be stripped off. I also added another half inch to allow for the length of the terminal. Once I had these measurements, I cut each wire to the specific length I needed.

MSD Mini Tool Strip Guides

The MSD Mini Strip Crimp tool has cutting guides. There are two guides, the larger one is for the 8.5mm wire, which is the one I will use. There are two lengths you can strip the wire to marked on the guide. The shorter one is for the dual crimp style terminal. The longer one (to the end of the tool) is for the style where you fold the wire back against the terminal prior to crimping, this is the one I will be using. Insert the wire into the cutting guide to the correct length.

Spark Plug Wire Stripping Guides

The stripping guide is precisely designed so that you can cut down into the wire without nicking the core. Using an exacto knife or razor blade, cut down into the wire. Spin the wire around in in the guide while holding the razor blade in place. I like to give it a few good turns to insure I’ve cut through all of the insulation. Once you have done this simply pull the wire out of the guide and twist the end piece off. You should have a perfectly stripped wire at this point.

Stripping Spark Plug Wire
Stripped Spark Plug Wire

Crimping the Spark Plug Wire Terminal Ends

Prepare the terminal Ends

After stripping the wire you are ready to put the terminals on. The MSD guide for this tools call for 1/8″ of insulation to protrude from the crimp section. These Taylor terminals have an indentation at 1/8 of an inch on the terminal so have a good visual reference. I found that the crimp tabs on these terminals were a bit wide to easily fit in the die. To remedy that, I used a pair of pliers to squeeze the terminals together until they fit snugly in the die. The instructions call for the very ends of the crimp tab to be bent in at a 90 degree angle. I used a pair of pliers to bend them in. This insures that they have a good crimp and hold on the insulation once you crimp the terminal on.

Plug Wires one eighth Guide
1/8" guide on Spark Plug Terminal End
Plug_Wires - bending-tab.jpg
Bending Tabs on Spark Plug Terminal Ends
Plug Wires bending terminal tab to fit
Bending Spark Plug Terminal Tabs to Fit Die

Crimping the Terminal Ends

Before placing the wire into the terminal, bend the conductor back alongside the insulation of the wire. The MSD guide calls for a small loop to be left in front of the wire, probably as a stress release point so that the conductor is not overly stressed. Make sure you have the terminal oriented at the desired angle you will need for that wire. Once you have the wire in the terminal, place it into the die. Make sure the tabs are facing towards the “W” in the guide. Insert the guide into the body of the crimp tool so that both of the tabs on the body and the die are on the same side.

Spark Plug Wire Relief Loop
Spark Plug Wire in Terminal
Using the Vise to Crimp with the MSD Mini Strip Crimp Tool

At this point you’ll want to use a vise to crimp the terminal on to the wire. It helps if you have one ready, opened to the right width to accept the crimping tool. Place the tool into the vise. The two tabs are there to serve as a guide. Rest the two tabs on the jaws of the vise. Turn the vise screw to clamp down on the tool. Be careful to not apply to much pressure to the tool as you can damage the wire. I closed the vise until there was a bit less than 1/8″ gap between the die and the body. Open up the vise and you should have a perfect crimp.

MSD Spark Plug Wire in Vise
Spark Plug Wire in Vise - Ready to Crimp
Correct Depth to Crimp Spark Plug Wire

Testing for Continuity

Once you have both ends crimped test for continuity. I have a few multi-meters. Set a meter for continuity testing and make sure the wire checks out. If you don’t have a meter, you can always used a small bulb or led and a battery. Another alternative is a continuity tester. You can usually find one at Home Depot or Lowes for a few bucks.

Putting the Spark Plug Wire Boots On

Putting Dielectric Silicone Grease on Spark Plug Terminal
Putting Dielectric Silicone Grease on Terminal

Inserting the wire and terminal into the boot will be the last task to make a spark plug wire complete. You will need some dielectric silicone grease for this. Dielectric silicone grease is available in small tubes at your local auto supply store. The dielectric grease serves two purposes when building your own spark plug wires. It will act as a lubricant when inserting the terminal end and wire into the boot (trust me, you’ll need it). Just as important, it will help seal the boot against moisture when installed on the engine.

Pushing the Wire Into the Boot

Apply a small bead of grease around the entire terminal end. you wont need to get it on the wire itself as the terminal will leave grease on the inside of the boot as you push it in. Insure that the terminal end is oriented correctly when inserting into the boot. Place the terminal against the opening in the boot and slide it in. You may have to work the edge of the wire insulation into the boot.

Pushing Spark Plug Wire Into Boot

You’ll encounter resistance so may have to push in fairly hard. Having a rag or paper towel handy will help. Inevitably, there will be some grease on your hands and wire. Wiping that off will help you get a better grip on the wire to push it in.

Twisting the Wire into the Boot

Optionally, you can screw the wire in. This makes it easier to get the wire fully seated in the boot. If orientation of the terminal is, you may want to mark the wire with a sharpie so that you’ll have a reference point as to where the electrode face is. As you get closer to seating the wire home in the boot, pay attention to the reference mark and get it as close as possible to the desired position. The deeper the wire gets into the boot, the more difficult it will be to orient it properly.

The Finished Spark Plug Wire

As a last step, take a final check by looking in to the boot. Insure it is seated all the way in. When making your own spark plug wires where orientation of the terminal is important, you may want to take a small screwdriver to do a final alignment of the terminal. There is one last step before the wire is complete. Take a small amount of dielectric grease and dab it around the inside of the boot where it will meet the spark plug. This will insure a good environmental seal and help prevent arcing to ground from unwanted moisture. It wouldn’t hurt to take one more continuity test at this pint to make sure that putting the boots on didn’t disrupt the electrical connection between the wire and terminal.

Finished Spark Plug Wires on Outboard

Watch the Video Version here