Having a spray booth is almost a must for most DIYers. I found myself in dire need of one when I started to mess around with spray on ceramic coatings a few years ago. When I looked into them, I found very few that were both inexpensive and usable. The ones I found were either too expensive or too small. So I went ahead and researched building a DIY paint booth.
Using and Old TV Cabinet for a DIY Spray Booth
I decided to see what the best way to make one would be. I quickly settled on converting and old entertainment center into one. TV cabinets had a number of benefits to converting one to a DIY paint booth. MNost of them had plenty of space. One added plus was having doors, you can seal the unit up when not using it.
Most of them, like this one, have doors that swing out, giving you a bit of extra protection and containment when spraying materials. The open doors also help to guide an air flow into the cabinet, helping with ventilation.
I was able to get a tall TV cabinet in reasonably good shape for $50. This particular TV cabinet was perfect for this. There was ample room at the top for the spray booth area. Additionally, there was a lot of storage room on the bottom of the cabinet. This was an awesome plus! I had storage room for spray guns, containers, paints and coatings and other various painting supplies.
There were basically three key steps I had to take to make a DIY paint booth from the old TV cabinet: 1) Seal up the holes in the back 2) Add Lighting 3) Ventilation I’ll cover the first two steps in this article. I’ll write a separate article on how I created a ventilation system for the spray booth. It’s a bit more complex and there are some physics that need to be explained, so that piece will take up most of a single article.
Cover up the Holes in Back of the Cabinet
Most TV cabinets (older ones at least) have a perforated section in the back. These allowed you to easily cut out the back and make room for the back of the huge TV. Pretty useless nowadays since those tube TV’s no longer exist, other than in museums. In any event, you want to seal the back of the cabinet. If you’re lucky, no one has cut out the back of the cabinet. If that’s the case. You can simply tape up the perforations with a high quality Duct Tape. I would use the Gorilla brand. That stuff has the amazing capability to stick to anything and not let go.
DIY paint booth TV Cabinet Inside Sealed
DIY paint booth TV Cabinet Back Sealed
In my case, the back of the cabinet I purchased had a large hole in the back where one of the previous owners had removed the perforated section. I bought a half sheet of 1/4″ luan plywood to seal up the large and smaller holes. Since I have a tendency to overbuild things, I of course bolted the patches of wood on. This involved a bit of drilling and lining up the first few holes. After that, I drilled around the perimeter and attached the plywood to the back.
Lighting Your Paint Booth
Lighting in a spray booth is critical. If you cant see what your painting, it will most likely turn out looking horrible. I decided to go with 12V LED strips. I found exactly what I needed on ebay. These were 18″ long LED strips mounted on an aluminum backing. They have a white hazy covering which is great for diffusing the light. More importantly, they were rated for approximately 1000 Lumens each. 8000 Lumens should be more than enough to light the interior of the DIY spray booth,
I mounted four of these at the very top of the cabinet and two each on either side of the doors. These are a bit recessed but are pointing in toward the work area. The light strips came with mounting tabs, so mounting was a simple matter of placing them on the location I wanted, and driving a screw in at either end.
DIY Paint Booth Four Light Strips on Ceiling
Recessed Light Strips on Front Facing into Cabinet
Getting the Wiring Installed
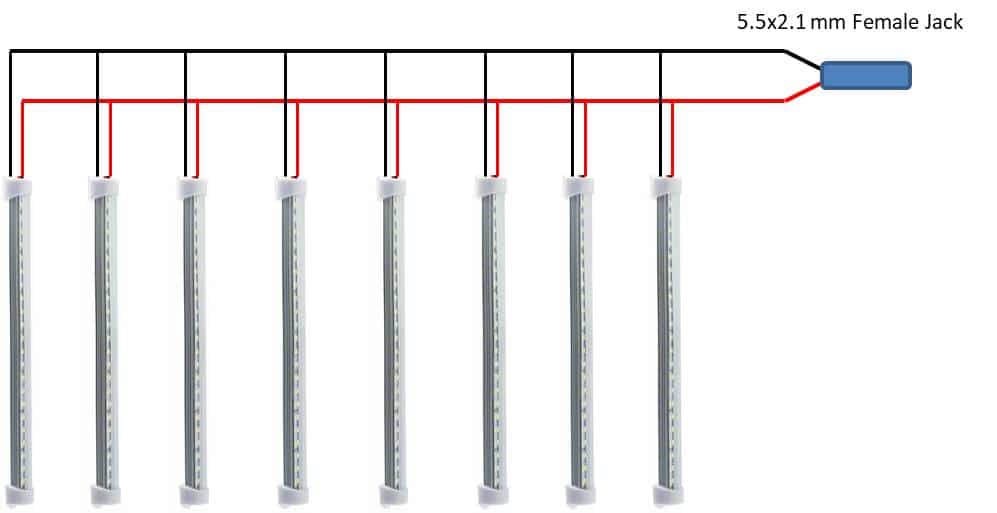
Wiring these all together was simple. I used 18 Gauge speaker wire (white/black) to wire the strips. Starting at the last LED strip, I wired the entire set in parallel (See diagram) and ended the run by drilling a hole on the right side of the cabinet. I ran the final length of wire through the hole and terminated with a 12V Female Connector (5.5×2.1 mm).
LED Light Wiring DIY Paint Booth
Receptacle wiring for DIY Paint Booth
There are several options to provide power to this setup. I installed a double gang electrical box on the outside of the cabinet. On one side of the box I installed a switch, on the other side I installed a receptacle outlet. I powered the whole box via an extension cord wired into the box itself. The last thing I did was add a heavy duty 12V adapter to the setup. The adapter is plugged into the outlet and is connected to the string of lights. The switch allows me to easily turn the lights on and off. VIDEO
The short video on the right shows the LED lights being turned on and off. It also shows the air vent I add described in the last section. of this article
Finishing the Work Area
I was left with a few things to finish up on in the in the interior. This cabinet originally had doors that opened and recessed into the cabinet. Somewhere along the line, the doors had been set to open and close without recessing. This left me with an interesting set of vertical bars that were mounted on sliding rails (horizontal) on either side of the cabinet. What I did was cut a 2×4 to size and mounted then top of the vertical bars. I used framing brackets and screws to insure that there was a solid connection on all both points. This allowed me to slide that entire assembly forward or back as needed.
Corner Brackets Left
DIY Spray Booth Corner Brackets Right
I added cup hooks on either side of that assembly and used a steel rod to create a base to hang objects from when painting them. I think this is pretty neat as it gives me precise control over where the object being painted is in the cabinet. If you look at the pictures above, you’ll notice the there are closed hooks on the right and open hooks on the right. This allows me to easily change the height of the steel bar and secure it in place.
Finishing Up the DIY Paint Booth
The last thing I did before closing out this phase of the project was to cut a vent on the top inside of the cabinet. I bought a heating and air vent from the local hardware store and mounted that in place. This vent would provide the ventilation when spraying materials in the cabinet. Naturally, I’ll have to provide some type of forced air (Vacuum) to properly vent the cabinet when in use. I ended up creating a system that uses the blower side of a vacuum cleaner to create suction. I’ll be dedicating a second post to that project so stay tuned for Part 2!