While grinding out a few larger cracks, I discovered that what I thought was a large crack on the bulkhead was actually a large chunk of fiberglass and gelcoat that had been glued back in. So It looked like I needed to do a gelcoat repair. This isn’t necessarily complicated or hard. There are several ways to go about doing a gelcoat repair. It really depends on the type and size of the damage. Additionally, you need to consider what you will be applying as a final finish.
In my case, I plan on finishing the boat with a two part epoxy sealer and primer, followed up by classic whaler blue polyurethane paint. So I opted to use a thickened epoxy mix to fill in the void. I would follow up the thickened epoxy resin with fairing compound. Incidentally, if the area of missing gelcoat is small enough, you can skip the epoxy. Fairing compound is perfect for filling in small areas of missing gelcoat. SInce this is a fairly large area, I opted with the thickened epoxy as a filler for strength and durability.
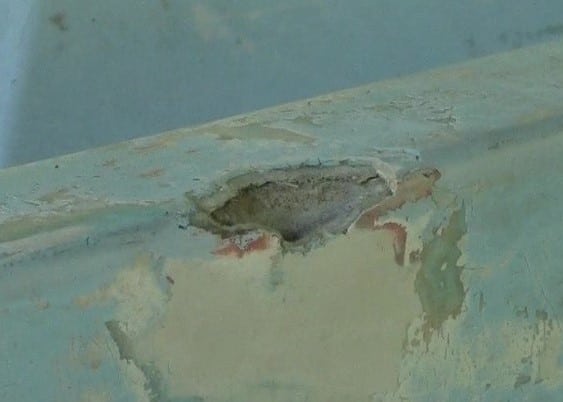
Prepping for the Gelcoat Repair
The first thing I needed to do was to clean the area up. A past owner had used silicone rubber to glue a large piece of the missing fiberglass and gelcoat back in. I had to carefully peel and scrape away all of this silicone. Epoxy resin will not adhere to this. Actually, I dont think any resin would! Additionally, the silicone would not create a stable base for any repair attempt.
After clearing away all of the old silicone, I gave the entire area a good wipe down with acetone. I keep a lot of acetone on hand for boat restorations. When applying fiberglass, gelcoat or epoxy and polyurethane finishes, it is imperative that the surface be squeaky clean. There cannot be any oil or other substances on the surface. Acetone does a great job of preparing a surface for patches or paint. Before I apply any filler to this repair I’ll give it another swabbing with acetone.
Clean up the Gelcoat and Substrate
One last thing before adding filler. Grind away the edges of the gelcoat. If you have foam underlayment, scrape some some of it away. You want fresh material so that the epoxy can adhere to it. Grinding away the edges of the gelcoat and the foam (if that applies) will give the epoxy a good clean base to stick to. Of course, vac or blow away the excess material and, you guessed it, wipe it down with acetone!
Prepare your Resin
I did this repair with epoxy resin. Polyester resin can be an option as well. Polyester resin does not have the structural strength that epoxy resins do. They rely on the underlying fiber of fiberglass mats for structural strength. Since this will not have fiberglass strands or mats, epoxy resin is a better choice.
I will be using milled glass as a thickener. There are a number of thickeners you can use. My preference for this type of repair is to use milled glass. There are several benefits to using milled glass. It adds strength to the epoxy. It also, in sufficient quantities, will thicken the epoxy so it has less of a tendency to run. In the past, I have added enough to make it as thick as jam. The idea is to keep it from running. For this repair, I made it fairly thick. I probably should have made it thicker, so that it wouldn’t run as much as it did. All in all, the repair came out good, so I’m not going to worry about it too much.
Epoxy and Milled Glass Thickener
Applying the Gelcoat Repair Patch
Apply the 1st Gelcoat Patch
Once the area is clean and prepped and you have your thickened resin ready, it’s time to start the patch. I worked the epoxy into the missing area with a flexible putty knife. Typically, I try not to overwork filler or fairing compound. In this case, I did, making sure that it was pressed in firmly to the foam underlying the gelcoat. I used a slow cure epoxy, so had to wait until the epoxy cured before proceeding to the next step.
Pressing in Epoxy for Gelcoat Repair
Sanding and Shaping Cured Epoxy
Once the epoxy cured, I shaped it in with a belt sander. I had an 80 grit belt on the sander for this. The belt sander is my preferred tool when rough shaping cured epoxy. This is especially true when you have straight surfaces such as the bulkhead I was working on. It does a good job of shaping in the patch and keeping it parallel to the surrounding surfaces.
Apply the 2nd Gelcoat Patch
At this point, The patch had filled in most of the void. There were still some gaps left, presumably from the prior layer of epoxy sagging. So I carefully wiped the entire area down with acetone again and prepared another batch of thickened epoxy. This layer didn’t need to be pressed in since the first layer had already made solid contact with the underlying material. I basically just needed to fill in the gaps that were left behind from the first application.
So, I got these filled in. After letting it cure, I hit it with the belt sander again. You can see in the picture that it is almost completely filled in. I expected this and had already planned on using fairing compound to finish off the gelcoat repair.
One thing you should consider when mixing up epoxy is to see if there are any other areas that may need repair. If I can take advantage of that, I will. I would rather get as much use as possible out of the marine grade epoxy I am using. It isn’t cheap!
Second Epoxy Patch Sanded
Finishing the Gelcoat Repair with Fairing Compound
The final finish to this gelcoat repair is going to be fairing compound. After sanding the 2nd application of thickened epoxy, there will be some minor gaps and imperfections. At least there were for this repair. I had planned on using fairing compound as a final filler anyway, there are a lot of minor spots that need filling in this whaler restoration, so I have been using fairing compound fairly generously. Applying the fairing compound is fairly simple.
Applying Gelcoat repair fairing compound
I used two part 1:1 total boat fairing compound. It’s easy to mix to the right consistency. Better yet, the hardener is blue and resin is yellow. You’ll know when it’s thoroughly mixed when the color is a uniform green color. There are a few things about this fairing compound I really like. One is it’s consistency. I won’t run on vertical surfaces. The other is that it sands and can be feathered in really well. We’ll see how that works out when I finish this topside of this Whaler Restoration!.
After setting the fairing compound in and letting it cure, I sanded it and shaped the entire repair. I used a random orbital sander with 80 grit paper on it. This gives me a little bit more control over the shaping aspect of it. For final sanding and shaping, I actually prefer to hand sand, particularly if there are any curved edges. I think that once I have this all primed and painted it should be undetectable.
Whats Next in this Boston Whaler Restoration?
Stay tuned for more, the next phase is going to be sanding and patching the entire topside. I’ve gotten a fair part of that done already. What remains is more sanding and patching with fairing compound. I’ll probably go through several iterations of that. It seems like the more I sand and patch, the more areas I find that need the same!
Check out my paid affiliate links below to the materials I used in this phase of the project.
Here is another article related to fiberglass repair on the whaler restoration Fiberglass Transom Repair