So far I’ve done a number of things to restore this old outboard to life. Before going any further though, I want to make sure there is adequate cooling for this engine. There are two things I’ll tackle to do this. First, I’ll replace the outboard thermostat. This engine hasn’t been in run on a boat in over 20 years and was run in salt water in the past. There’s a high probability that there’s a lot of corrosion and god knows what else in the water jacket. Once that is done I’ll pull the lower unit and replace the impeller and other water pump components.
Replacing an outboard thermostat can usually be done right on the engine. It’s a simple matter of removing the cylinder head cover. This will give you access to the outboard thermostat as well as the pressure relief valve. In this case, I actually removed the cylinder head. I wanted to inspect the cylinder bore and pistons. Besides, doing the outboard thermostat on the bench is a lot easier than doing it on the engine.
Removing the Cylinder Head
Outboard Head Removed Pistons and Cylinders
Before removing the head I had to do some prep work first. I first moved the indicator hose out of the way by removing the head cover bolt. Next I disconnected all of the grounding wires from the head cover bolt. Finally I removed spark plugs, coils and rectifier moving them out of the way so the head could be removed. Finally, I removed all of the cylinder head bolts and removed the cylinder head. I did see that there is some scoring on the cylinder heads. I’m getting roughly 120 PSI of compression on both cylinders so it isn’t a terrible impact but I can foresee a rebuild some time in the future.
Disassembling the Cylinder Head
Now that I have the cylinder head on the bench, I can begin taking it apart to replace the outboard thermostat. There are 14 bolts with 7/16″ heads total to remove. One of these is a special bolt that has the head mid way through the bolt and a separate nut to attached the ground wires too. You may want to mark the location of this bolt. This cylinder head had a clear imprint of the lock washer so I went ahead with that. Once all the bolts are removed, you can lift the cover off. You may need to pry it, I use a painters multi tool with a sharp edge to separate the cover. This is the same tool I will use to scrape the old gasket off.
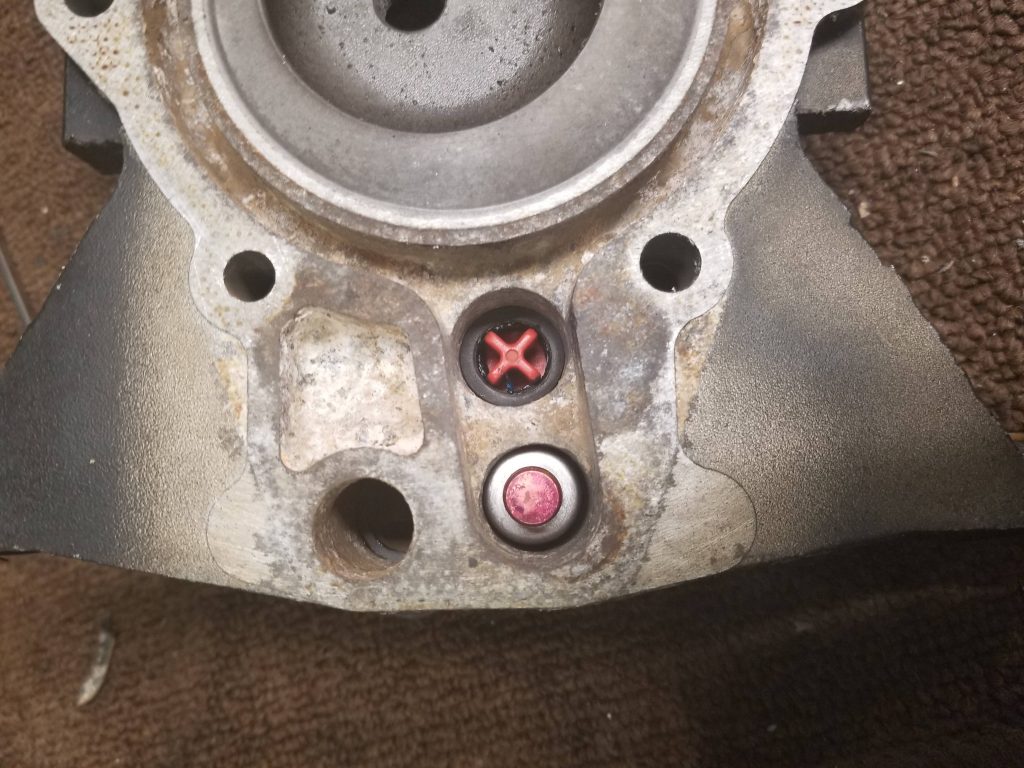
Outboard Head with Old Thermostat and Valve
Cylinder Head and Old Thermostat
Inspecting the Outboard Thermostat and Other Components
Inspect the thermostat and relief valve. After looking at these carefully, I concluded that the thermostat was probably shot. I could immerse it in boiling water to test it and see if it opens but decided to replace it anyway without testing it. I also saw that the rubber washer for the thermostat was in poor condition so will replace that as well. The pressure relief valve was in good condition (the red plunger) but the rubber grommet was stiff and brittle with age so I will also replace it. Over all the water jacket was fairly clean considering the age of the engine so a light overall cleaning would be sufficient.
Old Outboard Thermostat
New Outboard Thermostat Washer and Grommet
Cleaning the Cylinder Head and Cover
The next step will be cleaning the cylinder head cover and the mating surface on the cylinder head. I use a painters multi too (pictured) to scrape off as much of the old gasket as possible. There were some spots where the gasket was attached so firmly to the cover that attempting to remove it with this tool might damage the surface. For those spots I used a cupped brass wire brush on a drill press to remove the gasket material. I also used the fine cupped brass wire tool to go around the surface area of the cylinder head and cover. The goal is to have a bare metal mating surface for the gasket and gasket sealer to adhere too.
Cleaning Gasket Surface
Removing Old Gasket
Next I cleaned out the holes in the cylinder head for the outboard thermostat and the pressure relief valve. I ordered a set of brass bore brushes to do this.
Cleaning Outboard Thermostat well
I used the largest brass bore brush and ran it in to the holes for these components. There was a lot of salt and corrosion built up in there and the bore brush does a fantastic job of cleaning that up. I also used the smallest brass bore brush to clean out the bolt holes in the cylinder head cover, they had a significant amount of salt and corrosion built up in them as well. Be careful when using a wire brush around the temperature switch. This is where the wire comes out of the cylinder head. The temp switch in that slot will warn you of an overheating condition.
Brass Brushes
Using brass brushes is important when working on the cylinder head and cover. These parts are appear to be made of an aluminum alloy. Steel brushes can damage the softer aluminum surfaces. Brass brushes are less likely to damage the cylinder head and cover. Be careful when buying brass brushes. For this application, use “fine” brass brushes. Also look out for brass plated steel brushes. They may look like brass but are as abrasive as regular steel brushes.
Assembling The Cylinder Head
Once all the parts have been cleaned of old gasket material and residue you can begin assembling. I started by putting a light cot of Permatex Aviation gasket sealer. Permatex Aviation gasket sealer is a suitable substitute to the OMC gasket sealers the service manual calls for. I applied a light film around the gasket mating area on the cylinder head (water jacket side). You can see in the picture that I applied a bit more than was needed, going outside the area where the gasket sat.
Outboard head cover gasket sealer
I went ahead with installing the gasket after letting the gasket sealer get tacky. Lining up the gasket can be tricky. I have found that letting the gasket sealer get tacky allows you to place the gasket it place and using a thin Phillips head screwdriver, line up all of the bolt holes correctly. Next I placed the new pressure relief valve grommet in place and lubricated it with OMC/BRP triple guard grease. Once the grommet is well lubricated, place the red valve in place on the grommet. Make sure the tapered side of the valve is facing the grommet.
New Thermostat, washer and Relief Valve Grommet
Finally place the thermostat washer in and place the thermostat into the washer. Make sure the thermostat is correctly placed, in this case since we are placing it into the cylinder head from the water jacket side, the spring side of the outboard thermostat should be facing in to the cylinder head.
Sealing Up The Cylinder Head
Once the thermostat and relief valve are in place I applied a thin layer of gasket sealer on the gasket. I was a bit liberal in my first application (as you can see in the picture) but I will clean up the excess later with acetone. Place the spring on the relief valve. At this point you should place the cover over the cylinder head. Line up the spring with the socket on the cover and place the cover on to the head, while making sure to line up the bolt holes.
Gently press down on the cover until it is seated, you can use a thin Phillips screwdriver to make sure all of the bolt holes in the cover and gasket are lined up correctly with the cylinder head. Start with the middle bolts, snug the bolts down to hold the cover in place, otherwise the spring will lift the cover up.
Torquing Head Cover
Complete Outboard Head with New Thermostat
Install all of the bolts and finger tighten them. You’ll need to torque the head cover bolts to 60-84 inch lbs. Johnson does not call for a bolt pattern sequence to torque the head cover bolts down. I prefer to start in the middle and work my way out. I started with the three bolts that run through the middle of the cover, then went on to the bolts on either side of these bolts in a criss-cross pattern. Once these are done there are three bolts on the top and two on the bottom that can be torqued to spec.
The picture above on the above right shows the completed head cover, note that I wiped away the excess gasket sealant with acetone.
Reattaching the Cylinder Head
If you replaced your outboard thermostat with the cylinder head on the engine then you are done. I removed the cylinder head so need to put that back on. Before putting the cylinder head back on I tested the relief valve by pressing it in and releasing it. I want to make sure that it can travel freely before mounting the head on the engine. Clean both mating surfaces with a brass brush. Make sure you have a new head gasket. This gasket will go on dry. Once both of the mating surfaces are clean you can mount the cylinder head back on to the engine.
I found that placing the gasket on the cylinder head and inserting a few bolts made it easier as the bolts held the gasket in place when placing the head on to the engine. Insert and finger tighten the cylinder head bolts. These will be torqued to 216-240 inch lbs (18-20 Ft lbs). There is a specified torque sequence for the head bolts. This can best be described as working through the bolts in a spiral fashion starting at the middle bolt on the right as you face the engine. See the diagram on the right for the sequence. I prefer to tighten the bolts in a stages, first torquing them to 10Ft lbs, then 15 and finally 20 Ft lbs.
Outboard Cylinder Head Torque Sequence
Next Steps
Now that this is complete I will do one more thing before starting the engine again. When running it the past, I have noticed that there is a weak stream of water from the indicator (commonly called the piss stream). I am going to go ahead and pull the lower unit and replace the impeller and anything else that seems out of kilter. I’ll be posting on that soon! Once I have done that I’ll run the engine (still on a stand) and check the timing. After that, I’ll get on the fiberglass repair for the 1966 Boston Whaler this will eventually power.