In this part of the restoration, we will be going over restoring the Boston Whaler boat trailer. The trailer that came with my Boston whaler didn’t quite meet my expectations, partially due to the age of the some of the components. On this particular boat trailer, we will be replacing the Rollers, adding side bunks to the fenders and replacing the safety strap and hook.
The boat appears to have taken some damage to the sides when being loaded and unloaded. The chines look like they were hitting the fenders, causing damage to the hull. To correct that, I will be adding carpeted fender bunks as well to offer an extra layer of protection.
Removal and Installation of Strap and Hook
We’ll start off by replacing the strap and hook located on the front of the trailer. You will have to unwind the strap all the way out and cut and remove the old strap. Then, you can remove the old bolt that holds the strap to the assembly. In our case, the old bolt was rusted in place so we had to cut it off. You can use a handsaw or grinder with a cutoff wheel to cut it out. You’ll want to insert the new strap and put the new bolt in place. Be careful to not overtighten the bolt. If you want an extra layer of security, some Loctite on the bolt wouldn’t hurt. After these steps wind up the new strap and you’re done.
Replacing the Bow Roller
New Bow Roller on boat Trailer
The bow roller on a boat trailer is typically installed with a bolt. Replacement is fairly simple. Remove the bolt holding it on, you may have to cut it loose if it is badly rusted. I prefer to replace them with a stainless bolt and nut. Also, using a locknut is a good idea. Use a good quality marine grease on the bolt, this allows the bow roller to roll freely and prevents corrosion. I use BRP Triple Guard Marine Grease. Next, simply install the roller with the new bolt.
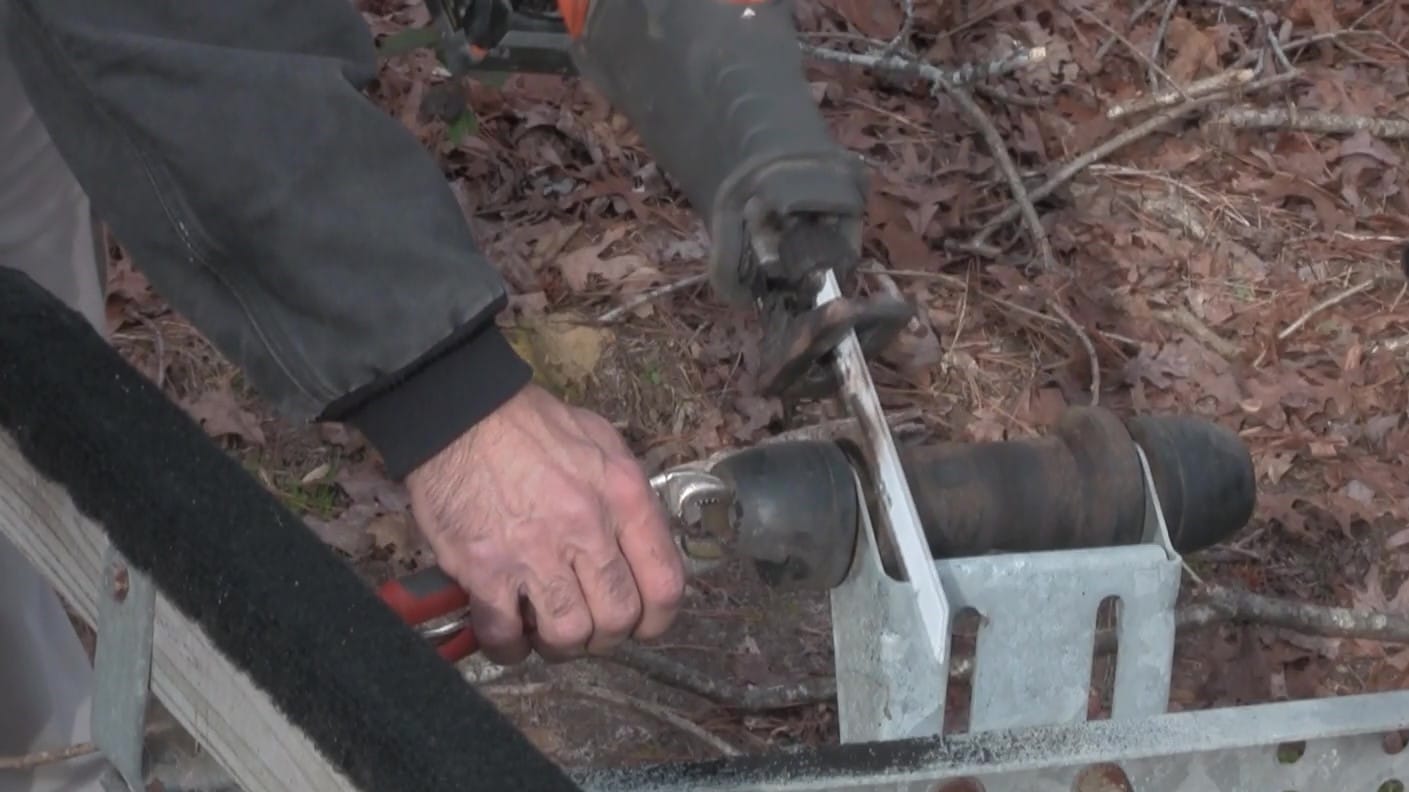
Replacing the Boat Trailer Rollers
The rollers I chose to replace the old rubber rollers are Stoltz polyurethane rollers with matching end caps. Using polyurethane rollers is important. As the old black rubber rollers age, they crack and degrade. They tend to mark and scar up the boat. Kind of like a crayon on paper or magic marker effect as I like to call it. The polyurethane is a much better quality product in my personal opinion.
New Keel Roller with Side Caps
I added end caps to protect the hull from accidental gashes. If your loading in a strong current or wind, there’s always the chance that the boat could go on cock-eyed. The increases the risk of the roller mounts hitting the hull. The end caps prevent that from happening,
Removing the Old Rollers
Removal of the old roller is fairly straight forward. Remove the old shaft. This may sound easy but years of corrosion build up may require that you cut the roller shaft off.
The rollers have caps, also called PAL nuts, that will have to be taken off with a chisel and a hammer. Note that you only have to remove one of the caps to remove the shaft holding the roller in place. You will not be able to reuse the old caps. You will need to get replacements which usually come with replacement rods. I ended up re-using the shaft on the front roller. I pried the PAL nuts off that shaft. The two rear roller shafts I cut off with a Sawzall and replaced them with 5/8″ SS shaft cut to the correct size to accommodate the roller bracket plus the additional length of the end caps.
Removing Pal Nut from Roller Shaft
Cutting Off Old Keel Roller Shaft
Lubricating the New Roller Shaft
Applying Grease To Roller Shaft
Line up the roller with the holes you drilled out and insert the new stainless roller shaft. Don’t fully insert the shaft leave it partially protruded and apply lube. I used BRP Triple guard grease to lube the new shaft. This makes inserting the roller easier and also provides smooth rolling motion for the new roller.
Getting the caps back on can be a bit of challenge. I found the easiest way to do this is place the cap on something solid. Next, tap the rod into it making sure it is flush. The next part is tricky, install the cap on the other side of the roller you just replaced. I used a 4 pound sledge as an anvil to hold the cap and shaft in place. Next, I placed the cap on the other side and tapped it into place with another hammer. In my case the were 4 rollers in total. Two that the boat rest on, one to protect the keel when loading and unloading, and the bow roller.
Installing Keel Roller Shaft PAL Nut
Making Carpeted Fender Bunks for the Boat Trailer
I noticed during my restoration of my Boston Whaler that there was damage on the hull. I believe this was caused by the hull hitting the fenders from loading and unloading. Consequently, I came up with an idea to fix this. My plan is to add side bunks to the fenders to prevent the chines from hitting the fenders.
Materials Needed for the Side Bunks
To get these side bunks built, you’ll need some materials. I’ll post affiliate links to some of these at the bottom of the Article.
6 ft 2×6 treated lumber
Marine grade Bunk Carpeting
Stainless Steel staples
Stainless Wood or sheet metal screws 1″ should work.
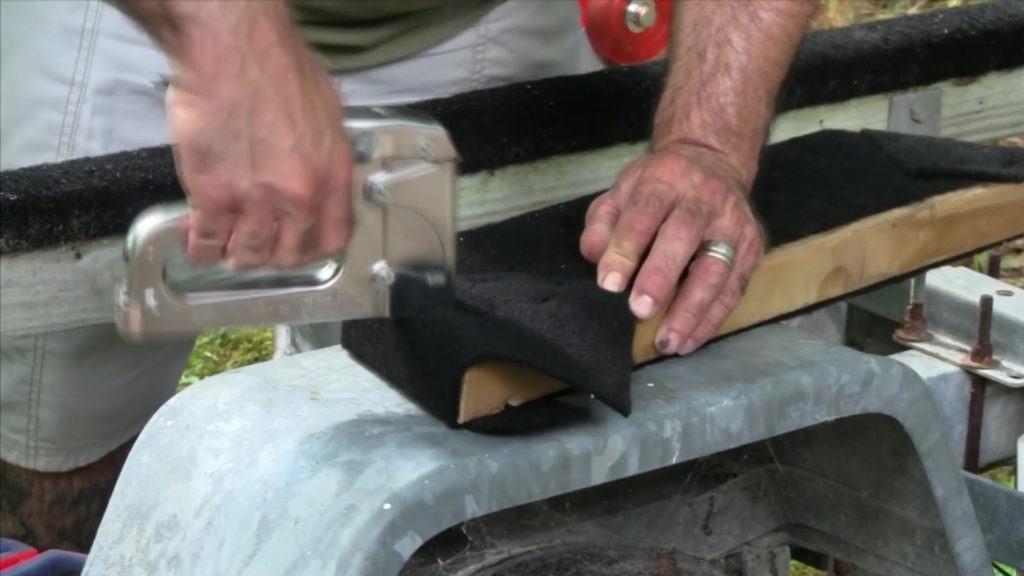
Fabricating the Side Bunks
Boat Trailer Side Bunk Wood
I cut the 2×6 lumber into two six foot sections. After that, I placed a piece on the inside of the fender and marked the wood with the outline of the fender. Next, I cut them, using my trusted skill saw, to match the contour of the fender. I made sure to make make it larger, about 2 inches on front and back.
Next you’ll want to measure the carpet and trim it to fit over the lumber you just cut, you can use a highlighter or bright colored marker for this as it makes cutting it more precise easier. Be careful during this stage, the result of not measuring properly can leave you with not enough carpet for both sides. The next step in this process is to staple the carpet to the wooden bunk making sure it is tight and evenly applied.
Installing the New Fender Bunks
After you have finished making the bunks you’ll need to install them. Make sure to line the Fender bunks up with the inside of the fender. I wanted make sure the bunks were high enough to protect the hull. Consequently, I raise the bunks by using paint stir sticks to slight elevate the bunk.
Attaching Side Bunk to Trailer
I used five bolts to secure the bunks to the fender. You can use as many as you like, just make sure that the bunk is secure. Note that you will have to drill through the fender to allow the bolts to sink into the wooden bunk. After drilling, place the bunk in its final position. Then, use an impact gun or just a plain old screw or nut driver to drive the screws through the holes you drilled. Congrats, you have just finished installing the bunks and the boat trailer is ready!
A Final Word on Restoring the Boat Trailer
I hope you enjoyed the process of me taking you through a partial restoration of a trailer that might have aging components such as mine did. I also have a video where I go through all the steps I just mentioned to you so if you will please go check out the video and leave a like or comment if you have any questions.