I’ll be writing about how to do a clean transom repair. A previous owner modified the transom so that a steering rod on a newer motor would work correctly. These old (1966) Whaler 13’s had a lowered (15″) transom. A pulley and cable system originally steered the boat. When past owners upgraded their engines, one of the things that they encountered was a different steering system.
Newer engines and rotary steering systems introduced a new way to steer a boat. Unfortunately, most owners opted to go with the system that has the steering rod going through the tilt tube of the engine. This left them with one problem, when steering hard to starboard, the steering rod would bump against the side of the transom. One solution was to cut into the fiberglass transom and reshape it so that it would accommodate the steering rod. Some of these were done cleanly and refinished. Others, well, lets just say were unsightly at best.
The unfortunate thing, is that they could have transom mounted the steering system (Diagram) and avoided the entire fiberglass reshaping and fiberglass repair. The diagram in the link above shows an installation requiring the transom modification on the left. The illustration on the far right avoids having to cut into your transom. I plan on installing my steering system that way. But first, I want to restore the transom to it’s original condition.
Restoring the Transom
First, I sanded out the old fiberglass that was used to cover the modification. Since I wanted to start with a fresh clean surface, sanding the old surface would give me the base I needed. I did not take it all the way down to the foam. Consequently, I left some of the old repair fiberglass in place. The next step is to select a good way to fill in the void. I initially thought I would use foam. My idea being that I could shape it and then glass over it
After giving this some thought, I ended up going with a piece of pine wood. There was a lifting/towing eye bolt that would go in this area. Using wood inside the repair would give it structural integrity. I’m not sure anyone has ever lifted these boats with the lift eye other than when initially rigging it. But it had to be able to hold up to the task if it was ever used that way. My thoughts were that between the wood and layers of fiberglass, it would be as strong as the original.
Shaping the Wood for the Transom Repair
My first challenge was to shape the wood correctly. It took several phases to do this. The first was relatively easy. I took a block of wood and put it up against the hole in the transom it would be filling. It was then a simple matter of marking out the section I needed with a sharpie and cutting it out with a bandsaw. I did need to do one thing before shaping any further.
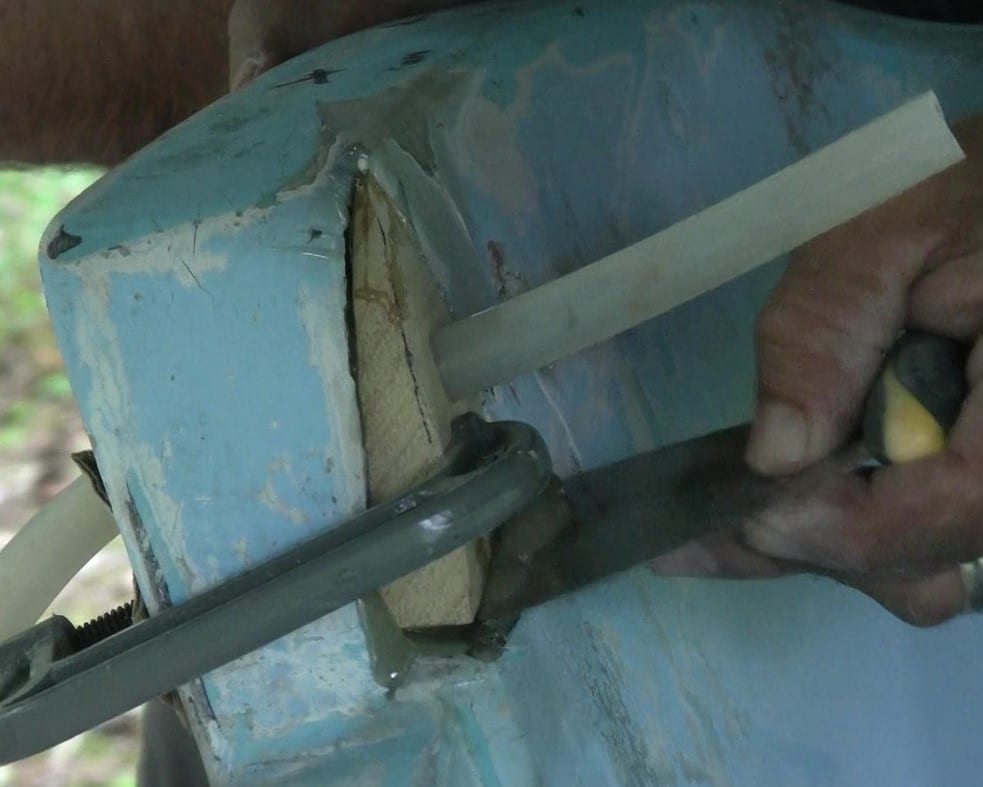
I had already uncovered the original hole for the lift eye, I used a short piece 5/8 silicone tube as a guide to drill a pilot hole in the wood. First, I clamped the piece of wood in place. Next, I drilled a pilot hole using the silicone tube as a guide for a 13/32″ drill bit. An odd size, but it fit in the tube perfectly. After that, I drilled the hole out to 1/2″ with the wood still clamped in place. I will later use a longer section of the 5/8 silicone tubing as a guide to line the wood in as I glue it in place with thickened epoxy.
Setting the Wood in with Epoxy
Once I had the pilot hole drilled in the wood, I marked it off to closely follow the lines of the transom. I then used a bench sander to rough shape it to the lines I had marked off. I did make sure to carefully mark which side to grind off. I’ve been known to grind or cut off the wrong side in the past! This left me with a closely shaped wood filler to fill in the large gap for this transom repair.
The next step was to glue the wood block in. I am using epoxy resin for this restoration project. I used mill glass thickener in the fast set epoxy to help fill the voids behind the wood block. The thickener also helps in keeping the epoxy from running to much. Before doing anything, I ran the silicone tube through the hole in the transom.
Gluing Wood Block Into Transom Repair
Next, I cleaned the entire area with acetone. I wanted to make sure there were no contaminants to keep the epoxy from adhering correctly. Next, I applied a generous amount of the thickened epoxy in the void behind where the wood filler would be placed. I pressed the wood block into place, using the silicone tube as a guide. Once I had all of the gaps filled with epoxy, I clamped it in place and patiently let it set.
Note the Silicone tube acting as a guide to position the wood filler block.
A quick note on Acetone
I prefer acetone to clean the areas I am about to use resin or fairing compound on. You can also used other greasers such as denatured alcohol. the important thing to remember is to clean and degrease before applying resin or fairing compound so that it will adhere properly.
Shaping in the Transom Repair
Getting ready for Fiberglass
Once the epoxy set, I used a 40 Grit Flap disc on a sander to shape the entire section. This is a key step. You want the filler to match and conform to the shape of the transom. It’s okay to cut away too much, but don’t overdo it. You want to get the shape and contours as close as possible to the final shape.
Fairing Compound and Sanding
There were still a few gaps around the edges of the wood block. I filled these in to provide a good base for the fiberglass. I used fairing compound to fill in these gaps. Once the fairing compound cured, I used a 5 inch circular sander to take down the surface between 1/16″ and 1/8″. Taking this much off the surface will leave us enough room to lay up fiberglass over the repair which can then be shaped to match the surrounding areas.
Make sure that as you approach the borders of the repair area that you feather in the surface area. That will make it easier to blend it in during the final phases of this transom restoration.
Fiberglass over the Transom Restoration
Now for the fun part. I added several layers of fiberglass over the repair. I am using several thicknesses of fiberglass for this. There are two layers of 1.5 oz chopped strand and then three layers of .39 oz chopped strand. Each layer overlapping the first by at least one inch with the final layers overlapping by two inches. I did this to be able to feather the repair into the shape of the transom. Laying in the fiberglass is relatively straight forward. I started by mixing up enough epoxy (or polyester) resin to get at least two layers on.
Once the resin is mixed, brush a coat on to the surface the fiberglass is going on. Make sure to roll it in to remove any air pockets. After that, use a brush to saturate the layer you just put on. Next, lay the next layer on over it and repeat the process. You’ll need to repeat this for every layer you put on. The five layers I put on ended up giving me a total thickness of about 3/16″. That should be adequate reinforcement to the transom lift eye. Note that I covered up the hole I made earlier, more on that later.
Preparing for the Final Transom Repair Finish
Once epoxy resin has cured, you’ll need to sand it down. I used an 80 grit random orbital sander to sand it down. You’ll have to make sure that the repair conforms to the shape you want it too. You will also want to feather in the edges of the repaired area to the surrounding areas. If you don’t, the transition will be glaringly obvious, which of course is not what we want.
The next step is to get a layer of fairing compound on. Fiberglass is tough, but it will not have a smooth finish. Gel coat typically is the final finish that is smooth. In this case, the fairing compound will provide the base for the final finish. I ended up using two coats of fairing compound and sanding in between the coats with 80 grit paper on the random orbital sander.
Make sure to extend each layer of fairing compound several inches beyond the last layer. This will help in feathering it in so that the repair is unnoticeable when you are done.
A Note on Fairing Compound
Epoxy based fairing compound is ideal for boating applications. The one thing you have to keep in mind is that it will not accept gel coats or other finishes very well. It has to be primed first so that finishes will stick to it properly. In my case, I’ll be using two coats of a two part epoxy primer over the entire boat. That will prep this, and all the other repairs for the final finish.
The Final Sanding
Fairing Compound Sanding Complete
Once the fairing compound has cured, you can sand it down and do the final shaping. I used a random orbital sander to do this. 80 Grit sandpaper is acceptable for this step. When sanding the final coat of fairing compound, make sure to feather the edges in. This will give you a smooth transition from the repair to the existing finish. I also use my hands to feel for imperfections. I’ve learned that my hands are far more sensitive and can feel things my eyes simply can’t see.
Finishing off the Transom Restoration
I left that for last. What I did was use the 5/8 silicone tube I used earlier. I placed that on the 13/32″ drill bit and open up the hole in the fiberglass layer from the back. Next, I used the 1/2″ bit and finished opening up the hole from the front. All that remains now is finishing.
Drilling Final Hole In Transom
Finished Transom Repair
Check below for paid links to materials I used:
I’ll be doing that once the rest of the interior of the boat is ready. There’s still a bit of work to do so stay tuned. If you’re interested in other aspects of laying down a fiberglass repair, check out this article. Anchor Locker Hole Repair- Boston Whaler Restoration – Part 3