I’m getting ready to start the hull and interior renovation on my 1966 13′ Boston Whaler. My plan is to start with the interior, which needs the most work. Before I get started with that, I want to remove the Whaler norman pins. This will give me access to the fiberglass and gel coat that needs attention.
What are Norman Pins Anyway?
Norman pins are the horizontal pins that traditionally are attached to a samson post. The samson post is used to to secure anchor or tow lines. The norman pins, sticking out the sides of the samson post, helped in securing the line in place. Boston Whaler is one of the few (if not only) manufacturer to use norman pins as cleats. My Whaler has three of them. One at the bow to secure an anchor line. As well as two at the stern, conceivably to tie to a dock or to secure other lines.
My First Attempt at Removing the Whaler Norman Pins
Whaler norman pins should be fairly easy to remove. At least in theory they should be. They use a standard threaded stud to hold them together. Unless of course. they’ve been solidly in place for over 50 years and exposed to salt water. That was the case with mine. The threaded stud in the middle had solidly corroded itself in place. In effect, corrosion welding the pins and stud together.
A New Strategy to get them off
I actually started to take these off a year ago. My first challenge was trying to get a good grip on them with pliers and not mar them. My Whaler norman pins are made of brass. Keeping them as pristine as possible was important. That way, I could clean them up and polish them on a buffing wheel. I tried thick pieces of rubber first. That ended up nicking one of the pins so I quickly gave up on rubber. In between attempts to take them off, I soaked the joints as best as I could with Free-All. Free All is my go to penetrating oil and has gotten me through some tough “Stuck” situations.
I made several more attempts before winter. As expected, I met with failure each time! As an alternative to rubber, I ended up cutting pieces off an old thick belt that I no longer used. The leather proved to be the trick in providing a secure grip with vise-grips without marring the brass. I still could not get these things to budge.
How Not To Mar Norman Pins when Clamping
If you need to clamp on to something without marring it, thick leather is the way to go. In the picture on teh right are the two pices I used to remove the norman pins. The one on the left has imprints from the vise-grip teeth, The one on the right shows the inside piece of the leather where it contacted the pins. This was a life saver, they allowed me to get a great grip on the pins without marring them in the least!
So I tried a different approach. Rather than brute force these on, I decided to start a program of periodically spraying with Free All. It is hard to tell if the penetrating oil is getting into the studs since they aren’t visible. But I periodically spray them whenever I’m near the boat. In retrospect, I think I went through an entire can of Free All!
Although frustrating, I diverted my attention to another aspect of this restoration. The boat came with a 1988 Johnson Outboard. I decided to go ahead and get the engine running as best I could. That engine had a number of issues that were probably caused by it a) running in salt water and b) not haven’t been run in over 20 years. Call me insanely optimistic, but I was determined to get that engine running. I put a lot of work into it over the winter. As a result, I’ve gotten that engine running great! Now I have to turn my attention to the boat! You can see the posts related to the engine here: 1988 Johnson Outboard Restoration.
In the interim, I continued the spray and pray strategy on the whaler norman pins (cleats).
Removing the Whaler Norman Pins
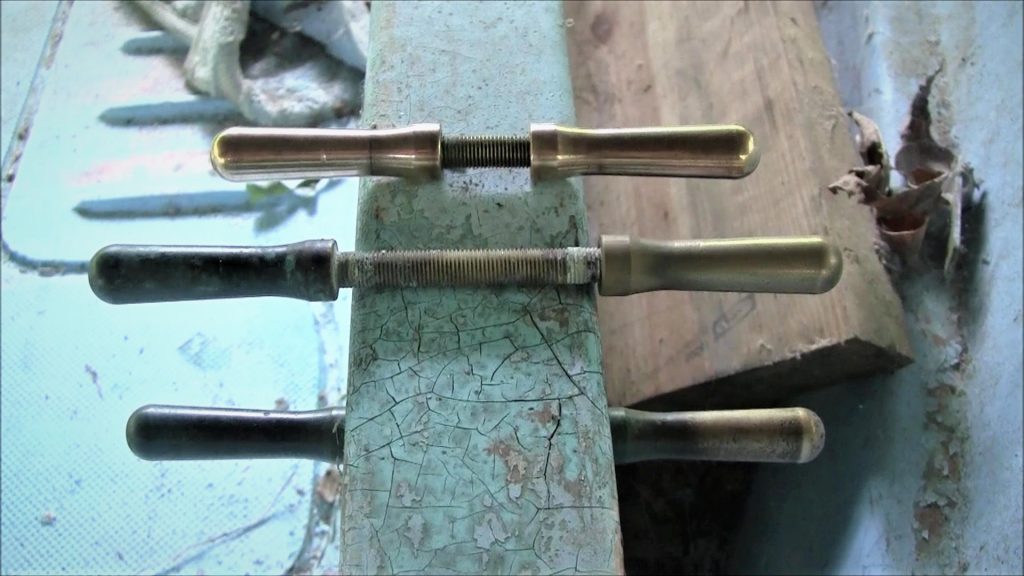
Now that Spring is here, I decided to go ahead and give the pins another shot. Before doing anything, I gave them a few more doses of Free All. After that, I cut some fresh pieces of leather belt. Using two Vise-Grip pliers, I secured the leather strips in place and clamped on the Vise-Grips. Taking a firm grip on both pliers, I wiggled them in opposing directions to try to break the corrosion free. After a few minutes of this, I gave them a hearty tug, again in opposite directions. To my surprise, the pins broke free!
That was a pleasant surprise. I had already devised alternate strategies to break them free. Some of them involving heating with a torch as well as freeze spray. Although loath to try them, the alternative was to cut them off an buy new ones. Much to my surprise, all three of the norman pins came off easily. I cant swear that it was just the Free All that helped. Perhaps it was a combination of the penetrating oil and the start contrasts we have in North Carolina between hot and cold in the winter. Just the same, I think that the combination of penetrating oil, leather straps and vise-grip pliers got them to where they would come off.
Cleaning The Brass Up
Now that the norman pins are off, its time to clean them up. I tried a few different approaches but here are the key ones that worked for me.
Cleaning the Threaded Studs
Threaded Studs – This was pretty easy I used a brass wire wheel on a drill press and was able to remove the majority of the corrosion on them. An even better solution was to soak the pins and studs in vinegar for about an hour. You can literally see the bubbles coming off the corrosion as the vinegar eats it away. It makes it a lot easier to get the corrosion of with the wire wheel. As a final touch, I used a small steel hand brush to clean the threads as much as possible.
Sanding and Polishing the Norman Pins
This proved to be challenging. I first tried the wire wheel. Surprisingly, The wire wheel did little to remove the green brass corrosion. I resorted to wet sanding the pins with 400 then 600 grit paper. Once I had the original brass color showing on the pins I proceeded to take them to the polishing wheel.
I have a polishing wheel mounted on a bench grinder. I use this to polish small metal pieces for my projects that need them. For the norman pins, I start with a white rouge which is coarser than the red, I then use the red rouge which is a finer abrasive to put the final finish on the pin.
Wet Sanded Cleat
Polishing the Whaler Norman Pins
Getting them on the Boat
My plans are to re-install these once the interior of the Whaler is finished. I will be taking some precautions to make sure they don’t corrode in the future. My plan is to use blue loctite Gel. The gel will make it easy to get an even coat over all of the threads. The Loctite will also hold the pins firmly in place. Another advantage of the loctite gel is that it will seal the threads from the elements, preventing corrosion. I plan on using the blue as it is the non-permanent so the pins can be removed in the future. I will be removing them periodically to refresh the polished look, probably at the end of each boating season.
Next Whaler Restoration Article
You can Watch the YouTube Version of this Article Below: