
For DIY homeowners, COVID-19 home lifestyle changes made one thing clear: home has to work harder for everyday living, not just weekends. The challenge is that outdoor kitchen design can feel like a big, expensive decision, and many backyard dining space ideas don’t translate into something that’s practical after a long day. With a calm plan and the right expectations, an outdoor kitchen becomes a comfortable extension of the house rather than a half-finished project. The benefits of outdoor kitchens are real, more time outside, smoother hosting, and easier family meals.
Quick Project Planning Takeaways
- Start by planning the layout so cooking, prep, and dining areas fit your space comfortably.
- Start by choosing outdoor rated materials that match your climate and maintenance comfort level.
- Start by setting budget guardrails early to guide what you build now versus later.
- Start by listing essential components so you buy and build in the right order.
- Start by aligning design choices with how you will cook and host in the backyard.
Plan Water and Drainage Early to Avoid Costly Rework
Once you’ve got your big-picture game plan, it helps to zoom in on the unglamorous details that can make or break your build, water and drainage. If your outdoor kitchen includes a sink, beverage station, dishwashing area, or a more built-in cooking setup, plumbing upgrades can quickly become the difference between “nice idea” and truly convenient day-to-day use. Even a simple prep sink needs a dependable water supply and a clear plan for where that wastewater goes, and those decisions are much easier (and cheaper) to make before anything is framed in or finished.
Because these components have to handle real outdoor use and occasional repairs, it’s worth sourcing professional-grade parts from a reputable supplier, think outdoor-ready fixtures, valves, connectors, and other essentials you can trust to fit and perform as expected. If you want a clearer sense of what you’ll likely need, start with recommended reading on plumbing supplies so you can plan upgrades with fewer surprises. With water needs accounted for, you can make smarter design choices around zones, materials, and weather-ready details.
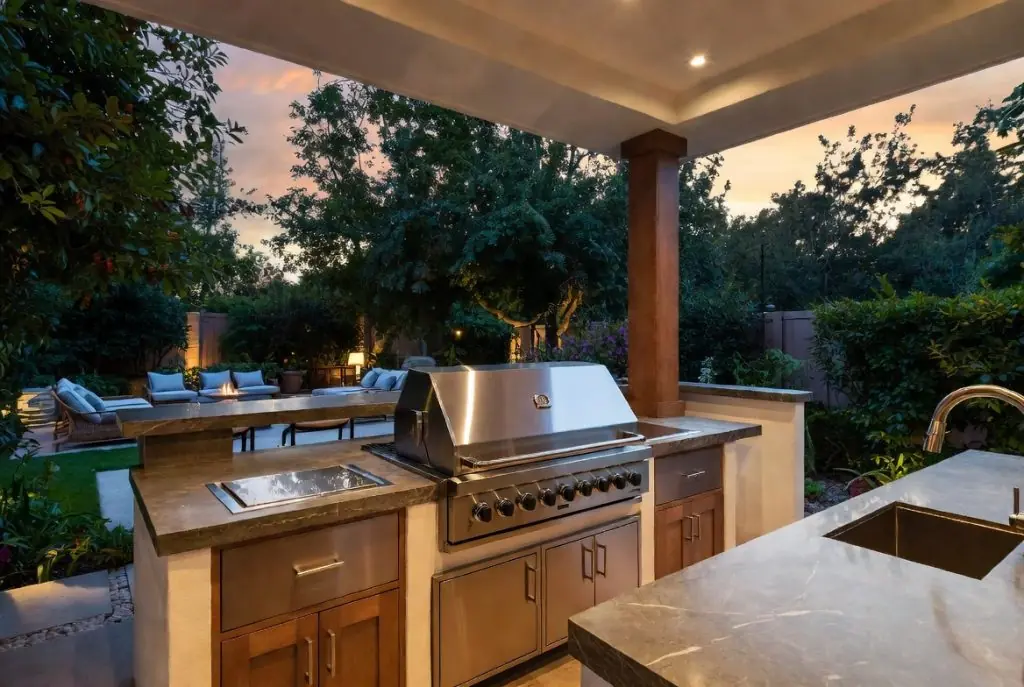
Understanding Outdoor Kitchen Design Basics
A great outdoor kitchen works like a small room outside, with clear zones for cooking, prepping, serving, and cleanup so you are not zigzagging with hot trays. It also leans on materials and appliances that can handle sun, rain, and temperature swings, like stone countertops can often withstand harsh weather conditions. Comfort details matter too, especially lighting and ventilation that keep the space pleasant after dark.
These principles protect your budget and your weekends. When zones are logical and surfaces are tough, you spend less time fixing and more time hosting. Good light and airflow make the kitchen feel inviting instead of tricky or smoky.
Think of it like setting up a buffet line: plates first, food next, drinks nearby, and trash at the end. A grill station with task lighting and a vented hood keeps nighttime burgers simple, even when the wind shifts. With the basics in place, a step-by-step build plan becomes much easier to follow.
Build Your Outdoor Kitchen, Step by Step
This process walks you from an empty patio to a functional outdoor kitchen with clear cooking and dining zones. It keeps beginner DIY decisions simple, so you can build safely, stay square, and avoid expensive do-overs.
- Tape out the full footprint (cook + dine)
Start by marking the outer edges with painter’s tape or chalk, including walkways, chair pull-back space, and where doors or gates swing. Stand in the taped area and “pretend cook” from prep to grill to serving to make sure traffic flows. This is also where a look ahead at the breadth helps you spot extra steps like adding wind breaks or relocating lighting. - Lock in the grill station first
Choose the grill’s exact location and face it away from the main seating area so heat and smoke drift away from guests. Leave comfortable landing space on both sides for trays and tools, and keep a clear, straight path back to the serving area. Confirm the spot works with your planned gas or power run before you build anything around it. - Set cabinet lines and keep everything square
Dry-fit base cabinets or framing on the ground and snap a straight reference line to keep the front edge tidy. Measure corner-to-corner (both diagonals) to check for squareness, then shim low spots so doors and drawers won’t bind later. Take your time here because straight bases make countertops, doors, and trim much easier. - Build a safe, flat countertop surface
Install countertop support framing or a continuous deck that is level in both directions, then confirm overhangs won’t block cabinet doors or appliance lids. Dry-set countertop pieces if possible to verify seams and clearances before final fastening. Keep seams away from high-impact areas where people will set heavy pans. - Anchor, seal, and test before “finishing pretty”
Fasten cabinets and appliances securely so nothing rocks, then seal gaps where water can enter and rot materials over time. Do a full function test: open every door, light the grill, check lighting at night, and walk the route with a loaded tray. If something feels tight or awkward, adjust now while access is easy.
Protect Your Outdoor Kitchen, Build Comfort, and Use It Often
Outdoor kitchens can feel like a lot to finish, so many surfaces, connections, and choices that it’s easy to stall right before the fun part. A simple, steady mindset keeps it manageable: build with intention, then settle into maintaining outdoor kitchens as a light routine while enhancing backyard comfort with a few cozy touches. The payoff is a space that stays clean, works reliably, and makes hosting outdoor meals feel natural instead of stressful. A great outdoor kitchen is the one that gets used, not just completed. Choose one first meal to cook outside this week and invite someone to share it. That’s how project completion motivation turns into enjoying outdoor living spaces for years to come.
