In this article I’ll cover a hull restoration . This involves a major hull fiberglass repair. I fixed the normal gelcoat and small fiberglass damage you would expect on an old Boston Whaler. But, I also found that the large chine on the port side had been compromised. Surprisingly, it was completely open to the elements and much of the underlying foam was gone.
Consequently, I had to replace internal foam that had apparently been washed out. The outside port side chine had major damage on this Boston Whaler 13. You could see that it had been repaired before but in the state it was in, there had to have been major water intrusion.
Ironically enough, there’s no evidence of water in the hull (weight) but there are major voids (foam) and soft spots in the areas where the water would have come in. I suspect that when operated at speed, water came in through the void with great force and basically power washed the foam out!
Identifying the Soft Spots
First, I did a walk around the entire Boston Whaler hull pressing on the hull to see if there were soft spots. I found that the area around the hole in the chine was soft. Curiously enough, there were soft spots directly behind it almost all the way to the transom.
Next, I made sure to mark off the spots that needed filling. Interestingly enough, you could almost draw a straight line from the hole straight back. This leads me to believe that much of the foam washed out from the force of the water coming in through the hole in the chine.
Replacing the Foam
Next, I needed to fill in the voids where the foam has been washed out. I opted to use the Loctite version of insulating foam for this. In the past, I have used the Great Stuff in the past but wanted to try the LocTite foam. I’m glad I did as this foam seemed a lot denser than the Great Stuff when it finished expanding and curing.
Preparing the Boat for Replacement Foam
Before using the foam, I had to drill holes in the hole over the voids. I drilled two different diameters of holes. The first was just big enough for the tube of the can of foam to fit in, the second was slightly larger. These were expansion holes. The foam expands aggressively and I did not want it to deform the hull when expanding.
Before drilling, I marked off the areas that needed to be filled. I also marked out the lines where the fiberglass mats would lay. Doing this gave me a guide for cutting and laying the mats. Once I had everything marked off, I drilled the holes out. I ended up drilling 15 fill holes and 5 expansion holes for a ratio of 3:1.
Injecting Foam Into the Hull
Next, I shook the can vigorously per the instruction. Then, it was as simple as inserting the nozzle into the fill holes and giving it a squirt. As a precaution, I injected the foam in small bursts. It started expanding almost immediately! Even a small burst would result in foam starting to creep out of the expansion holes.
Finally, I went through all of the fill holes and injected enough foam so that the closest expansion holes started emitting foam. Unexpectedly, the foam expanded so much that it started to come out of the large hole in the chine that was compromised! This was great as the foam would give me a good base to rebuild the chine. After that, I waited a day so that the foam would finish expanding and curing.
Cutting the Foam
When I came back the next morning, I was surprised to see a large pile of foam segments laying on the hull. As expected, the foam expanded aggressively and was extremely hard! I used Ridgid multi-tool with a cutting head to trim away all the excess foam. Next, I sanded all of the excess foam down so that it was flush with the hull.
At this point, I did a quick test of the hull. Pressing on the previous soft spots yielded no movement at all. Apparently, the injected foam added significant structural strength. I still planned on sanding down the gel coat enough so that I could add several layers of fiberglass mats for reinforcement.
Preparing the Hull Fiberglass Repair
In order to start putting down a few layers of fiberglass, I needed to first repair the holes I had drilled to inject the foam. I started this step by using a dremel tool with a cone shaped burr tip. I used this to cut away the foam underneath the fiberglass around each hole. This will allow the resin to flow underneath the fiberglass and lock the patch over the hole in place.
Next, I took a round stone burr about one inch in diameter. Using my die grinder, I carved out a divot around each hole. I did this to make room for the thickened epoxy patch that I will put on each of these holes.
Patching the Holes
After that, I put in small patch over each of the holes I had drilled. I used TotalBoat 5:1 Epoxy thickened with Milled glass and small pieces of chopped fiberglass stranded mat. Basically, I made a thick slurry out the epoxy and thickener. Subsequently, using a tongue depressor, I filled in each of the holes getting it as close to the adjacent surface as possible. After that, I let it cure before going on to the next step.
Additionally, I want to be able to blend it in to the surrounding areas. After sanding it down to the glass, I noticed that it was a little lumpy. I used a random orbital sander with 60 grit paper and sanded the entire area smooth. Having a good smooth surface is important before putting layers of fiberglass on.
Before laying in a few sheets of fiberglass Mat, I needed to prepare the surface. I did this by sanding the entire area down. An 80 grit flap disk took all of the gelcoat off in the repair area. Additionally, I made sure to level the patches as well. I want to make sure that when I start applying stranded mat and epoxy that there’s a good base for it.
Glassing in the Hull Fiberglass Repair
The next step was relatively simple. I wanted to add three layers of fiberglass using 1.5 oz chopped strand mat. I used the TotalBoat 5:1 epoxy resin to lay up the mats. Before doing anything, I redrew the lines I had drawn earlier as the original ones were mostly sanded away. Having the lines was a crucial guide in cutting the mats and laying them in place. Next I cut out all the pieces of fiberglass mat I would need.
First, I needed to reinforce the chine that was compromised. I had already filled it in with the thickened epoxy slurry. To give it the rigidity and strength I was looking for, I laid a piece of the fiberglass mat directly over the compromised area. Using a finned roller, I molded the ends to create the same profile as on the chine on the other side of the hull.
Applying Layers of Fiberglass
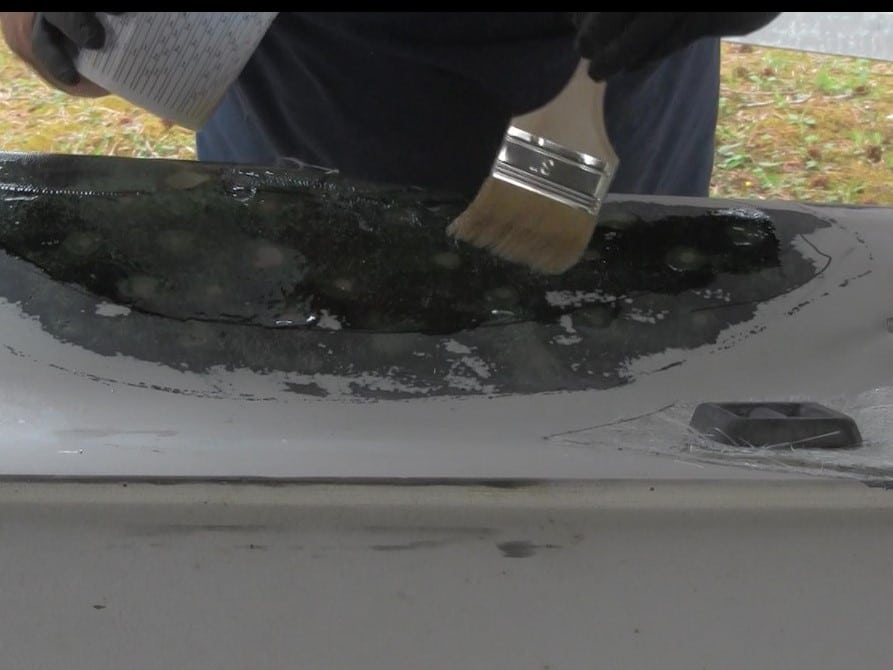
Once I had the chine sealed, I brushed on some fresh epoxy. Making sure the underlying layer is saturated is a key to layering the fiberglass. Next, I laid the next piece of fiberglass on and brushed epoxy resin over it. Before laying the next layer of Fiberglass on I rolled the entire area with an aluminum finned roller. The goal here is to insure there are no air bubbles in the mat. Additionally, to make sure that the mat is well saturated with resin.
Applying the last layer went pretty much the same as the first. Brush on the resin, lay the mat on it and then brush and roll resin into it. The key difference with the last layer is blending it into the existing fiberglass and gelcoat.
One way to do this is to tear the edges of the chopped strand mat where it blends into the existing fiberglass. The frayed edges make it easy to build a transition layer into the existing fiberglass and gelcoat. In this case, I opted to just build the resin up in the transition areas. This did result in a few drip lines. That is not really a problem as It will be sanded down as part of the hull fiberglass repair.
After the Resin Cures
Hull Fiberglass Repair After Final Sanding
Finally, after letting it cure for a few days, I finished up the last part of this fiberglass boat repair. I am preparing it for the next phase, which is for fairing and priming. I did this by using a disc sander. I first used a 60 grit pad to shape areas that needed it. Next, I went to an 80 grit pad. The 80 grit helped me achieve a smooth surface as well as helped me get good transitions from the border of the repair to the existing fiberglass and gelcoat.
In my next article on this Boston Whaler restoration I’ll be fairing and applying an initial coat of primer.