Replacing a universal joint is within the means of most home mechanics. The most likely show stopper for most is the lack of specialized tools. What many may not know is that you can replace u joints with standard tools. I’ll cover both in this article. How to use specialized as well as standard tools to replace your universal joint.
Universal Joint Parts
There are a few key components we’ll need to be familiar with to discuss replacing a U Joint. The center piece is called cross piece or journal cross, The ends of the cross pieces have bearing caps or cups. The inside of these cups are lined with needle bearings that allow the cup to rotate freely over the cross trunion. The bearing caps fit over the trunion of the cross piece and into the mounting ears of the mounting ears on the yoke. There are two types of snap rings used to hold universal joints in place, internal and external. Both are fairly easy to remove. I’ll be working with the external types in this article. The internal snap rings are easy as well and can be removed with needle nose pliers and a screwdriver.
A picture is worth a thousand words, so here is a link to a great page that has an illustrated drawing of a u joint. There’s also a good deal of information on how they work! Universal Joints
Disassembling the U Joint
Remove the Snap Rings
Snap Ring Pliers u joint
Removing the snap rings can be done with a set of needle nose pliers. In this picture below, you can see how to pinch the clip together and subsequently pull it out. Alternatively, I prefer to use a pair of pliers specifically made for this. These are u-joint snap ring removal pliers. They make the job of removing (and replacing) snap rings easy. Make sure to wear safety glasses when working with snap rings. They can fly off the pliers at high speeds!
Remove the Universal Joint Bearing Cups
Once you have the snap rings off, the next step will be to remove the bearing caps. You do this by literally pushing them through the universal joint. By pushing the cap through, you can then remove the far end cap and slide the u joint cross out. There are a number of ways to do this. I’ll cover two in this article. The first will be using a bearing removal tool. This is by far the most efficient way to do this. But, it will require that you own, buy or rent one. The second method is to use a large vise along with a socket and a wrench. I’ll cover more on that later.
Disassembling the Universal Joint with the Bearing Removal Tool
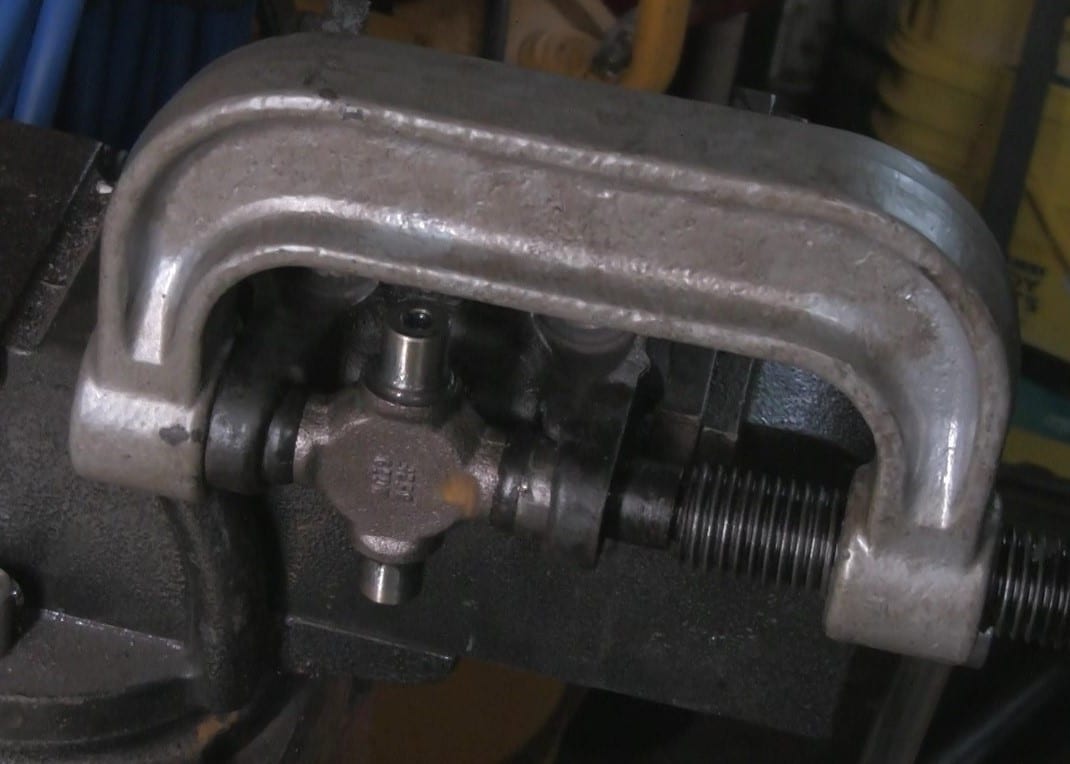
The bearing removal tool resembles a large heavy duty c-clamp, which is basically what it is. To remove the bearing cap, you have to the place the tool over the u joint. The end with the large hole must be centered over the bearing cup on the far end. If it is not, the bearing cap will hit the tool and stop. Once you have the tool lined up, simply drive the bearing cup (on the screw side) into the joint. If you meet resistance, STOP!
Check the far end and make sure the side with the hole is centered over the bearing cup. You may have to re-align the tool a few times until the far end bearing cup starts to protrude. If it is clear, continue driving the screw cap side in.
The far side bearing cup should start to protrude as you drive the screw side bearing cup into the joint. If you have enough clearance, drive the screw side bearing cup all the way in until it pops loose on the inside of the joint. At this point, the far side should protrude far enough to be removed with a pair of pliers.
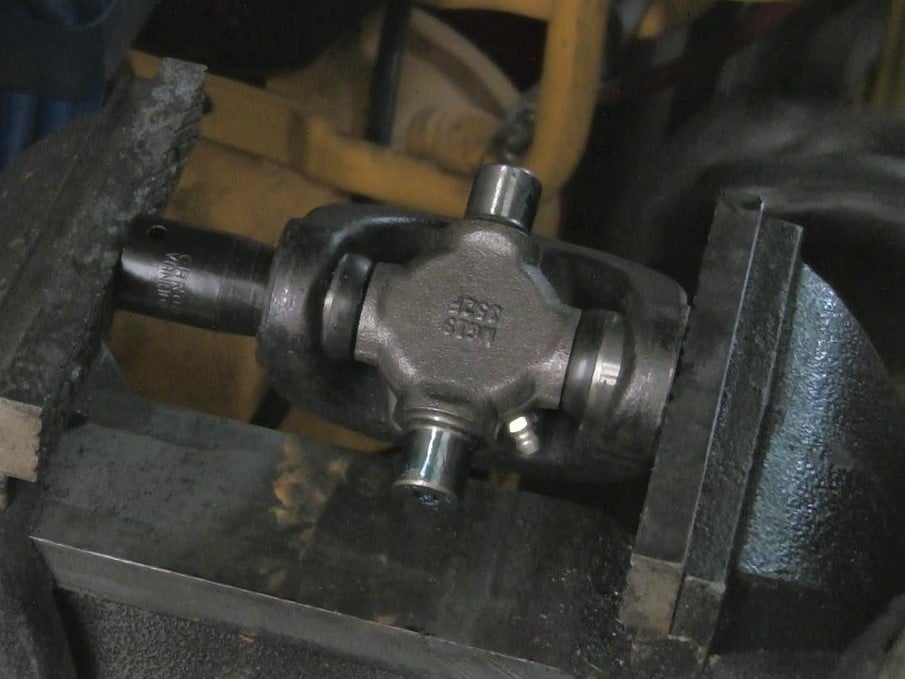
Remove the bearing removal tool. With a pair of pliers, you should be able to remove the far side bearing cup by gently twisting it. Pull the cross out of the housing. However, if you don’t have enough clearance, you’ll have to reverse the process and drive the remaining bearing cup out (the one you pushed in first). Once the first side of the universal joint is out, you can repeat the process on the other side to completely take the universal joint apart.
Alternative method to remove the u joint
The second method I’ll describe is removing the u joint with a large vise. You’ll also need a socket that has an outside diameter SMALLER than the bearing cap you will be pushing in and a wrench that has a closed end LARGER than the bearing cap to be removed. It also help if you have a third hand or a helper to get everything lined up! Tighten the vise once everything is lined up. The socket will push the bearing cup into the u joint.
As a result, the opposite end bearing cap will protrude into the space provided by the wrench. Next, you should be able to remove it from the vise and remove the protruding bearing cup from the joint.
Reassembling the New Universal Joint
Careful with the Needle Bearings!
Now it’s time to reassemble the new u joint. In it’s most basic form, it’s simply a reversal of the process you did to take it apart. The key things you need to watch for when assembling the u joint is that the needle bearings inside the bearing caps stay in place. This happens periodically and is frustrating. Typically, you’ll have to partially disassemble the u joint to set the bearing back in place.
Collapsed Needle Bearing
Setting Needle Bearings In Place
Luckily, there’s an easy way to tell if one has fallen to the back of the cup. The bearing cups should fit flush against the inside of the trunion base. When a needle bearing has fallen to the back of the cup, the bearing cup will not seat all the way in. If you look closely, It’s quite noticeable and the amount of space left is, Ironically enough, the width of a bearing needle! Should that happen, you’ll have to remove the bearing cup and put the bearing back in place. Luckily, it’s easy enough to use a small screwdriver or needle nose pliers to set the needle bearing back in place.
Installing the Bearing Cups and the Cross
To re-assemble the u joint, start by placing a bearing cup into one side of the yoke of the u joint. You can use a vise, a c-clamp or the bearing removal tool to start pressing the bearing cap into place. Press it in about 3/4 of the way into the yoke. At this point, you want to slide one end of the new cross into the yoke, opposite of the bearing cup you just pressed into place. Once you do this, you can then slide it back into the bearing cup. Then place the opposite side bearing cup into the yoke. Next, carefully center the cross between the two bearing cups.
The cross should now be centered between the two bearing cups and far enough in each to keep the needle bearings from collapsing. You can use a vise, the bearing removal tool or a large c clamp to press both of the bearing caps in. At this point, it is sufficient to have them flush with the outside of the yoke. Stop and check that the needle bearings are all in place before going any further. Do this by slowly sliding the cross back and forth. The seal on the cap should snug up flush against the base of the trunion on the cross. If it doesn’t, a needle bearing fell out of place! Hopefully it hasn’t and we can finish assembling the u joint.
Putting in the Snap Rings
To finish this half of the universal joint, you will have to depress the bearing cup a bit further in. This will allow you to place a snap ring behind it to lock it in place. You can use the same process and tools you used to take the U Joint apart. I find it easier to use the vise and a socket to push the cap in far enough to get a snap ring in. You can use needle nose pliers or the snap ring pliers. In this picture I am using the snap ring pliers to install the snap ring. I then repeat this on the other side of the cross to get the snap ring on.
We now have half of the Universal joint assembled! To finish it, we simply repeat this process with the yoke it will be connected too. One last piece of advice, do the longer heavier side of the driveshaft first. If you install the cross on the larger side, it will be far easier to maneuver the smaller yoke when finishing up the universal joint.
Below are affiliate links to the tools I used in this article and the YouTube video. The last tool (2 claw bearing puller) is useful for yoke flanges that are flat on the inside such as u joints that have the snap rings on the inside.