My first attempt at starting the Johnson 40hp Engine resulted in a few sputters and a bang or two. Consequently, I checked the carbs and drained the one on top. My reward was a stream of prehistoric ooze. I tried removing the screw from the bottom carb to drain it as well, I found that the drain screw was firmly lodged in there. Worse, it was practically inaccessible since you could not get a screwdriver squarely on it. As a result, I went ahead and got ready for a carburetor rebuild on this old Johnson 40hp.
Carburetor Parts Kit
You need parts for a carburetor rebuild. Start by ordering the appropriate rebuild kit for the carb you are working on. This carb repair kit has had several revisions and the latest one is the OMC/BRP 396701. This kit is listed as no longer available on many of the marine supply houses. The Affiliate link below is perfect as it has two complete kits, You’ll find that many of these kits have a lot of extra parts. The kits are designed to handle a variety of carburetors so don’t be alarmed at the leftover parts you’ll have.
Disassembling The Carburetor
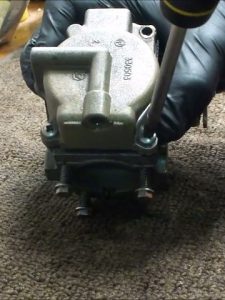
I started by removing the carbs. Removing the carburetors is fairly simple. Remove the link between the two carburetors. You’ll have to pull the VRO fuel pump to the side to get to the 1/2″ nuts. Getting to these is fairly simple with a standard 1/2″ wrench. I used the wrench to loosen the nuts and then using both hands, removed the nuts and pulled the carb off.
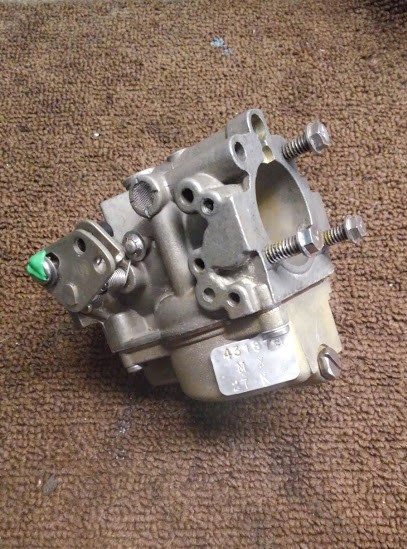
Remove Johnson Carburetor
Once you have them off and on the bench you can start the carburetor rebuild. Take the drain screw out and drain the carb. Turn it upside down and remove the four screws holding the float bowl on. Remove the float bowl. Also remove the float bowl gasket and the emulsion pickup tube gasket. Once you have removed the float bowl you’ll be able to remove the float, needle valve and needle valve seat. Remove the float by pushing the retention pin out of one side. The needle valve will pull off with the float. Unscrew the needle valve seat.
Unscrew the screws holding the Float Bowl on
Remove Float and Needle
Remove Needle Valve Seat
You will also want to remove the main and idle jets. The main jet is in the float bowl and can be accessed through the hole the drain plug was in. I ground down the sides of a spare screwdriver to fit inside of this hole. Using this screwdriver I was able to remove the main jet. I used the same screwdriver to remove the idle jet. The idle jet is located in a recess on top of the carburetor on the side opposite the engine.
Remove Idle Jet
Fast Jet in Float Bowl
Cleaning the Carburetor
The Johnson service manual says not to use a dip tank. Considering this, I bought a few cans of carb cleaner spray for this carburetor rebuild (there’s two carbs I have to do). I sprayed all of the orifices several times as well as the bowl. Make sure to give the emulsion pick up tube a good cleaning inside and out. Make sure the areas where the float bowl gasket contact the carb are clean and free of old gasket material.
You want the jets to be thoroughly clean. For this reason, I make liberal use of the spray cleaner. Give the two jets a good cleaning as well.. I would advise wearing eye protection as well when using the cleaner. There are a lot of nooks and crannies in carburetors. Consequently, you’re bound to get some splash back. Usually in fact, to the most undesirable places (like your eyes).
Cleaning The Carburetor
Cleaning the Emulsion Pickup Tube
Checking for Leaks
The Johnson service manual calls for a leak check between the emulsion pickup tube and the body of the carb. You do this by pouring isopropyl alcohol into the tube and checking for leaks where the skinny portion of the tube meets the carb body. See the picture. Mine leaks so I sealed it with red loctite.
Checking for Leaks
Emulsion Pickup Tube Sealed with Red Loctite
Installing the Float Bowl and Needle Valve
Install the needle valve seat with the provided gasket into the carburetor base. Snug it up but don’t gorilla it in. Use the clip provided in the kit to attach the needle valve to the float bowl. In this case, the needle should hang down on the opposite side of where the depression is in the float bowl. Subsequently, you’ll be installing the float and needle into the base of the upside down carburetor in the same position.
Insert the needle valve into the seat while it is connected to the float. Line the holes up at the end of the float with the mounting posts on the carb. Slide the retaining pin in to lock the entire float and needle valve assembly into place. The replacement kit came with a plastic pin, I don’t trust a plastic pin. As a result, I elected to use the old steel pin that was originally with the carb.
Installing Needle Valve Seat
Installing New Float and Needle
Adjusting the Float
Adjusting the float is a fairly simple process. First, hold the carb upside down. The service manual calls for a special tool to adjust the height of the float. You can do this visually. You’re looking for the bottom of the float (Actually facing up with the carb upside down) should be parallel with the body of the float. It is ok if it is slightly elevated on the far end from where it pivots. Next, turn the carb right side up. Check to see that the distance from the top of the float bowl (at its lowest point) is between 1 1/8″ to 1 5/8″ from the base of the carb. Adjust the height by bending the little tab at the end of the float in (to raise it ) or out (to lower it).
Correctly Adjusted Carburetor Float
Measuring Carburetor Float Depth
Install Idle and Fast Jets
Install the fast jet into the float bowl, once seated put a new o-ring or gasket (whichever comes with your kit) on to the drain plug and install it. I ground the edges of this screwdriver specifically for this so it would have an exact fit.After that, install the idle jet and tighten it until it is snug. Be careful not to over tighten either of the jets.
Installing Idle Jet
Fast Jet in Float Bowl
Install the Float Bowl
Lay the gasket included in your carburetor rebuild kit on the body of the carburetor. Carefully place the float bowl over the assembly. I like to make sure the screw holes and gasket are properly aligned so I’ll use a punch or a Phillips screwdriver to line the holes up. Place a small amount of loctite blue on the original screw and turn into any of the screw holes to get it started. The Johnson service manual calls for OMC Screwlock, a bit of light research revealed that Loctite blue was a good alternative. Once you get all four screws in place, tighten them in a cross pattern. You can tighten to a bit past snug, but not much as you don’t want to distort the gasket.
Installing the Float Bowl and Gasket
Securing the Float Bowl
Final Steps for the Carburetor Rebuild
Now that the carb is complete (I’ve actually already rebuilt the other one), I’ll mount them on the engine. First, I’ll take the reeds out though and inspect. I figure this is a s good a time as any since the carbs are off. When everything is back together, I’ll prime the carbs with gas and do a final check for leaks.
Click Below to view the carburetor rebuild on youtube