The paint booth that I converted from an old TV cabinet is complete. I left off with adding and exhaust vent at the top of the cabinet. The next step is to ventilate the cabinet and put in a paint booth exhaust of some kind. I did a bit of research. There were plenty of options available. Box fans, computer fans and squirrel cage fans were just a few of the options I ran into.
I had just finished purchasing a small dedicated vacuum cleaner for my blasting cabinet. With that in mind, I decided to look into whether I could use the blower side in some way to ventilate the spray cabinet. I wanted to keep the expense on the low side so if I could come up with a system to use both sides of the vacuum (suction for the blast cabinet and blown air for the paint booth) This would be a perfect solution for a paint booth exhaust.
The Venturi Effect
I settled on constructing a PVC exhaust engine that would use the Venturi effect to create a vacuum. the vacuum will draw the air out of the vent in the cabinet. The Venturi effect is a physics principle where a constricted flow (of air or water) created a low pressure area directly behind it. The constriction causes an increase in velocity of the media, causing a decrease in the pressure of the media. This also brings the Bernoulli Principle into it. The Bernoulli effect states that an increase in velocity, will cause a decrease in pressure. They both work hand in hand. Rather than try to give you a complete explanation of the physics behind it, here are a few links that if you’re inclined, you can explore further:
The design I cam up with was both simple and relatively inexpensive. I used a section four inch schedule 80 PVC and some 1.5″ PVC and right angle fittings. Using the smaller PVC and fittings, I planned on introducing the output from the vacuum cleaner into the four inch PVC and with a right angle fitting. This would direct the stream of air towards the output side of the pipe. Here is an animated illustration of what I planned on doing.
In the animation on the left, the blue arrows represent the output of the vacuum. This exits the smaller PVC pipe on the inside. The flow of this air (blue arrows) creates a vacuum behind it, drawing in the air behind the large tube (red arrows). Here is a good video describing how you can create a vacuum with a stream of compressed air on youtube.
Once I collected all of the materials I needed (I had most of it laying around from past projects), I started by opening up a hole in the four inch PVC. The hole needed to be an exact fit for the 1.5″ pvc. I ended up using a dremel tool to cut the hole as the hole saws I had would either be too large or too small.
Cutting out the hole in PVC Pipe
Test Fitting the PVC Pipe
After test fitting the size of the hole, I used a heat gun to flatten the area around it. My thoughts were that I wanted to get an airtight fit. Flattening the area would allow me to glue the PVC into place.
When the PVC gets hot enough, It gets pliable. I used a piece of 2×4 too press down on the area, leaving me with a flat spot where I could secure the fittings too.
Heat gun Making a flat spot in PVC
Putting the Paint Booth Exhaust Together
Next, I had too get the fittings cut to the rights size to fit neatly into the tube. I used to right angle fittings, one on the outside where the blower side of the vac would be attached to. The second one for the inside where the output would create a vacuum in the large tube. The image below is a good illustration of how I will finally assemble the Venturi exhaust system.
Assembling the system is pretty straight forward. I glued the three inner pieces together first. Starting with the small 1.5″ long piece (that penetrated the four inch PVC wall. I glues that into the right angle and then glued an 18″ piece of 1.5 in PVC to the other side of the right angle. For the top side, I simply glued a 3″ length of PVC into the second right angle.
Paint Booth Venturi Exhaust Glued Together
Once I had both of those sections together, I inserted the inner piece into the four inch PVC pipe and pushed the smaller pipe through the hole I had previously cut in the PVC pipe. After that, it was a simple matter of gluing the top and bottom sections together.
Inside View of Venturi Exhaust
Inside the Paint Booth
The final assembly itself is pretty simple. One area I didn’t want to neglect was the air intake inside the paint booth. I had already used and HVAC floor duct for the opening. I added a grate with a filter on it. My goal is to catch any large particles of paint before they make their way into the Venturi Vacuum system. The filter is cut from a large strip of HVAC filter material sold at local home improvement stores. I glued a small strip of wood across the back of the cabinet so I could attach the cover to the vent opening. The cover itself did not fit exactly so I taped it on to hold it in place.
Venturi Paint Booth Exhaust Cover and Filter
Paint Booth Exhaust
Putting it all Together
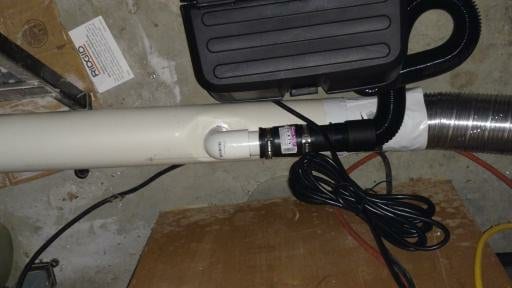
Venturi Exhaust Installation Complete
The final steps to putting it all together simply involved connecting the output of the vacuum cleaner to the outside port on the Venturi tube and attaching the tube to the exhaust duct on the cabinet. I used expandable dryer ducting to make this connection and also used it to take the output from the Venturi system and vent it outside when using it. This makes it easy to open the garage door and run the ducting out when I need to use the spray booth.
A Final Word
One thing I am being cautious about is making sure that volatile chemical vapors dont go into the system. I suspect that there is a great deal of static electricity created by the moving air. A static discharge could ignite and flammable vapors. I’ll probably install a grounding strip in the future to help alleviate that potential issue.
Now that I have completed this part of the project, I have a decent size paint booth with ventilation. Make sure to see part one of how made the paint booth.