The AR 15 is one of the most prevalent rifles in the U.S.A. There are a number of different variants of the AR rifle. The most common variants are the AR-10 (.308) and the AR-9. There are pistol variations as well, typically in the 9mm or 40 S&W calibers. One thing they all have in common is that many owners are opting to build their AR’s themselves. This starts with an AR lower receiver, which is what we’ll cover in this article.
The AR 15 Lower receiver in the animations are all part of an AR 15 pistol build. The build method and parts are the same as they are for a rifle so this article can also be used as a guide to an AR 15 Pistol build.
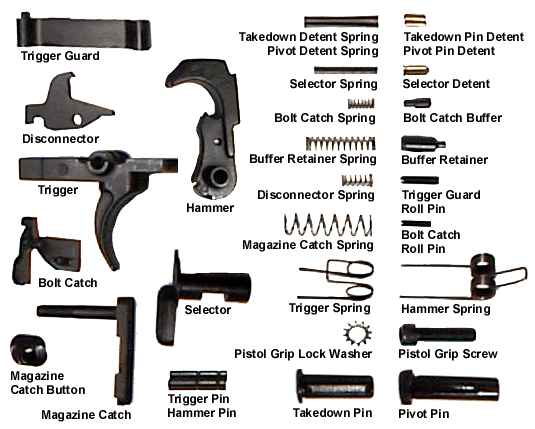
Get all your AR 15 Parts together
The first thing you’re going to want to do is to get all of the parts that you’ll need to build your AR 15 lower receiver. The majority of these parts are legal to buy without any checks or regulatory paperwork. The one part that you will have to go through a licensed FFL dealer is the stripped lower receiver. Here is a list of the parts you will need to build an AR Lower Receiver.
Stripped AR Lower Receiver (FFL dealer required)
LPK or Lower Parts Kit, may or may not include pistol grip
FCG Fire Control Group (Trigger and related parts)
Buffer tube, spring and buffer (preferably Mil-Spec)
Butt Stock
I have my favorite manufacturers for these parts but will let you draw your own conclusions on which AR 15 parts manufacturers to use. I would suggest that you talk to your local FFL dealer. They can make recommendations on which parts they carry as well as the pros and cons of each. You can also go to AR15.com where there are a number of great articles that can help you with that decision.
AR15.com has an excellent picture of the components you’ll be using.
Tools You will Need
There are a few tools you should have on hand to build your AR 15 lower receiver. Some of these are specialized, most are not. Ironically, most of these are tools that should be in any DIY gunsmiths toolbox. Here’s a short list of what you will need to complete the Lower Receiver. You’ll find affiliate links to them at the bottom of the article.
Roll Pin Punch Set – for this you will need a 1/8” punch. I prefer a roll pin punch, simply because it is designed to fit neatly in the roll pin.
Jewelers Hammer
Punch Block or Wood Block – a Back stop when your driving roll pins in
AR 15 Lower Receiver Vise Block
Needle Nose Pliers – To hold the roll pin when starting it.
Hex wrench set
Armorers wrench
Torque Wrench
AR 15 Lower Receiver Vise Block
How to Build the AR 15 Lower Receiver
AR 15 Lower Receiver Trigger Guard
Depending on the AR Lower Receiver you have, you may or may not have to install a trigger guard. If your lower receiver has a built in trigger guard, skip this section. If not, read on! The most common trigger guard for an AR 15 is flat. There are variants that have a bow in them to accommodate gloves. These are typically called winter trigger guards.
In any event, installing a trigger guard is relatively simple. The typical AR 15 trigger guard has a spring loaded pin on one side and a hole for a roll pin on the other. The spring loaded pin would be inserted in the front of the AR 15 receiver. You will set the rear roll pin in. Use a pair of needle nose pliers to hold it in place. Next, gently tap it to get it started with a jewelers hammer. Finally, drive the roll pin in with your 1/8” punch and hammer.
A quick note, I have noticed that on some receivers, inserting the spring loaded side towards the front creates a binding problem with Magpul magazines. Should that happen, reverse the orientation and put the spring loaded pin in the back and the roll pin in the front. You may also encounter custom trigger guards that use roll pins in the front and back. Just roll with it and install the roll pins as you normally would.
Installing the AR 15 Lower Receiver Magazine Catch
The next piece you will want to install is the magazine catch. Install this piece before the bolt catch as the bolt catch may interfere with installing the magazine catch. You start by inserting the catch into the receiver as shown in the. Flip the receiver to the other side. Insert the spring in the hole for the magazine release button. Next, place the button over the spring and press down on it so that it is inserted into the hole.
You should feel it contact the actual catch. Once it is in contact with the catch, you can spin the catch clockwise. This will thread the catch into the button. Keep threading the catch into the button while depressing the button in as far as it will go. Test if you have threaded it in far enough by depressing the button as if you were releasing a magazine.
The catch should stay within the socket. If it protrudes too far, there is a risk that when you release a magazine it may get stuck in the release position. If you find that it can spin out of position, wind it one more turn.
Installing the Magazine Catch
Repeat until you can depress the magazine release button and the catch stays in the recess for it. You may want to test it with a magazine before going any further. Make sure it retains a magazine and releases it when you hit the button.
Installing the AR 15 Lower Receiver Bolt Catch
Traditionally, the bolt catch is held in place with a roll pin. However, many of the new receivers use a threaded bolt catch screw in place of a roll pin. These bolt catch screws have a 6/32ths thread and have a 1/16″ hex head to install. I’ll cover how to install either style of Bolt Catch retainers.
There are four key components that make up the bolt catch. There is the bolt catch spring, the bolt catch detent, the bolt catch roll pin or screw and of course the bolt catch itself.
You’ll start by inserting the spring in the hole just below the where the bolt catch pivot pin/retainer spring goes. Next, you’ll insert the detent into the spring. Next, you’ll install the bolt catch into the socket for it as depicted in the picture (PICTURE).
Bolt Catch Roll Pin Installation
If you have a roll pin AR 15 lower receiver you’ll install the roll pin next. The easiest way to do this is as follows. Use a 1/8″ Allen wrench to hold the bolt catch in place. Insert it from the front to back. This will hold the bolt catch in place as you insert the roll pin. Using needle nose pliers, place the roll pin in place on the opposite side of the bolt catch.
Before you go any further, you may want to apply masking tape to the side of the receiver you are working on. This will keep any wayward hammer blows from marring your receiver.
Gently tap it in place to start it with your Jewelers hammer. BE CAREFULL, this is where most marring of lower receivers occur! Once you have it started, use your 1/8″ roll pin punch and jewelers hammer to carefully set it in until it is flush with the lower receiver tab. As you drive the roll pin in, it will push the Allen wrench out the other side
Bolt Catch Threaded Screw Installation
If you have a threaded screw type of bolt catch retention system, installation is far easier than with a roll pin. You will have to hold the bolt catch in place while manually inserting the threaded screw. The front of the screw is a smooth shaft which will engage the bolt catch as well as the far end of the socket.
Once it is in far enough it is simply a matter of using a 1/16″ hex wrench to set it in place. I prefer to use a small amount of red loctite on the threads here to prevent the screw from walking out. Drive it in far enough so that the head is flush with the lower receiver tab.
Installing the FCG “Fire Control Group”
There are a number of options for a fire control group in your AR 15. The number of available options although not infinite, is fairly large. There are drop in and component triggers that feature lower trigger weights. You can even purchase a binary trigger which fires on the pull and the release. Prices for Fire Control Groups vary from super cheap ($35 bucks or so, avoid these!) to $400+ triggers.
In this article, I’ll focus on the traditional Mil-Spec Fire Control Group. These triggers have nine key components. There’s the trigger, trigger spring, Hammer, Hammer Spring, disconnector, disconnector spring, safety and two retaining pins.
Assemble the AR 15 Trigger and Disconnector
The first thing we will do is assemble the trigger and disconnector and associated spring. One side of the spring is wider than the other. You will insert the wider end of the spring into the socket on the upper rear of the trigger. You can tell it is in as there will be a slight click when it is set in place. Next, you will simply place the disconnector in place. There is a tang on the back of the disconnector that rests in the spring.
Before placing the trigger assembly in the receiver, you’ll want to mount the trigger spring (see above). The trigger spring is the smaller of the two springs in the trigger FCG. The square end of the spring rests on the tab in front of the trigger. The coils slip on to the two ears on either side of the trigger. The two legs of the spring should be pointed towards the front of the trigger.
Mount the Trigger in the Lower Receiver
At this point, we can go ahead and mount the trigger into the AR 15 Lower Receiver. Insert the trigger into the fire control cavity. The two legs of the spring should point forward. Press down on the trigger and adjust until you see the hole in the trigger line up with the rearmost hole in the lower receiver.
You can now insert the retainer pin in. There are two notches in the the pins for the FCG. It is a good practice to Insert the pin with the longest smoothest side first. Once in place, the two notches will be visible on either side of the trigger. The hammer spring legs will rest in these notches, helping to keep the pin in place.
Install the Hammer in the Lower Receiver
To install the hammer, you first want to mount the spring to it. The square end of the spring rests on the back of the spring. The coils slip on over the two ears of the hammer, the two legs should face towards the back of the hammer. one of the most common mistakes in installing the spring is putting it on backwards. If it’s on backwards the legs will be facing the front of the hammer, they should be facing the back.
Next, place the hammer into the receiver (springs facing back). You’ll have to exert some pressure on it to compress the spring legs and line up the holes correctly. Place the retaining pin into the receiver and through the hammer. Once again, insert the long smooth side of the pin first. This will keep the internal spring on the hammer from prematurely engaging the slot on the pin making it hard to get the pin in. That same internal spring will help keep the pin from walking out once it’s set in place.
Installing the Safety Selector and Grip
Next you will want to install the safety selector and grip. The reason you want to do this at the same time is that the detent for the safety is held in place by a spring that is in turn held in place by the grip.
Install the Safety Selector Switch
Start by cocking the hammer back, this allows the safety selector to slide in easily. Slide the safety selector in as if it were in the “fire” position. Once the selector is in place, carefully release the hammer by pulling the trigger. Make sure to hold the hammer while letting it down gently, you don’t want the forcefully hitting the bare aluminum of the AR lower receiver.
You can test the function of the Fire Control Group at this point. Cock the hammer back and while holding the hammer, depress the trigger. You may want to also test the safety as this point as well. the safety will not stay in place at this point as there is not detent installed yet. That will happen when we install the grip.
Install the Safety Selector Detent
Next, turn the lower receiver upside down. Drop the safety selector detent into the hole in the area where the grip will be installed. You may want to insure the safety is still in the fire position and jiggle it a few times. This will help the detent hold it firmly in place.
Next, prepare the grip. I prefer grip screws that have a hex drive head rather than a slotted screwdriver head. It makes it a lot easier to install the grip with the detent spring. IF you have one of these, mount the screw on the allen wrench and set it aside.
Install the Grip and Detent Spring
Insert the detent spring into the hole on the side of the grip. To make this as easy as possible, turn the receiver so that it is laying on it’s side. Carefully install the grip, making sure that the spring slides into the hole where you installed the detent. Press the grip into place. While holding the grip in place, test the function of the safety selector, making sure that it detents in the fire position as well as the safe position. Note that you will have to cock the hammer back in order to place the safety in the safe position.
Final Installation of the Grip Screw
While keeping the assembly sideways, yo can insert the screw with the allen wrench and tighten into place. If you have a slotted screw you can your the lower receiver upside down and try to drop it in place. Alternatively, you can remove the grip, drop the screw into the hole in the grip and then remount the grip.
The easiest way to do this is to once again have the receiver on its side. Carefully start installing the grip. You’ll have to make sure the spring is in place. Leave about a half inch between the receiver and the grip. At this point, start threading the grip screw into the receiver. Once you have started it you can press the grip into place and finish installing the screw.
Installing the Buffer Tube and Rear Takedown Pin on your AR 15 Lower
At this stage of the build we’ll be installing the buffer tube and rear takedown pin at the same times. Part of the buffer tube is the end cap. The end cap also servers as a retainer for the detent spring for the takedown pin. Note that you have to do this steps simultaneously.
Installing the Buffer Tube and Takedown Pin
Start this phase by installing the takedown pin into the rear hole for it. Next, install the pin detent into the small hole that is in the rear of the receiver next to where the buffer tube screws in. Before you go any further, we’ll need to prep the buffer tube, castle nut and end cap.
Thread the castle nut on to the buffer tube. Make sure that the large slots on the castle nut are facing toward the rear of the buffer tube. Screw the castle nut until it will go no further. The further back the better! There is a reason for this which I’ll explain in a moment. Next slide the end cap on to the buffer tube. Make sure that the “bump” on the end cap faces the front of the buffer tube.
Now, thread the buffer tube onto the back of the receiver. Stop when the edge of the tube reaches or is just behind the hole for the buffer detent and spring. Next, insert the buffer detent spring into the hole in front of the tube and put the buffer detent on the spring.
The Buffer Detent and Spring
You’ll have to depress the detent so you can screw the buffer tube in. I prefer to use a pair of needle nose pliers for this. This is another area where if you are not careful, the detent and spring can shoot out of the receiver never to be found again! Screw the buffer tube in until the edge of the buffer tube is holding the edge of the buffer detent in place.
At this point, you’ll still have the castle nut screwed all the way to the back of the buffer tube. Slide the endplate back toward the castle nut as far as it will go. Next, install the takedown pin into the receiver and install the takedown pin detent and spring into the hole in back of the receiver. Now slide the endplate forward to lock the spring you just installed in place. Finally, screw the castle nut forward until it is snug against the end plate.
Torqueing the Castle Nut on your AR 15 Lower
We’ll finish this off by torqueing and staking the castle nut in place. You’ll need to set your torque wrench to 40 Ft pounds, which is the specification for the castle nut. WARNING, if you have a polymer AR 15 lower receiver, check with the manufacturer for the correct torque spec. I have heard that some Polymer receivers will break if torqued to spec but have not experienced this myself.
User the Armorers tools to torque the castle nut on. There is a 1/2″ notch in the armorers tool to set the wrench in. Make sure your lower is in a vise using a vise block. The magazine vise block works well for this. Insert the torque wrench into the 1/2″ slot on the tool.
Place the round end with the tooth of the armorers wrench over the castle nut making sure that the “tooth” on the wrench engages one of the notches on the castle nut. With one hand, grasp the receiver tightly to hold it steady. With the other hand, tighten the castle nut until it reaches 40 ft lbs. The typical torque wrench will give you a noticeable click when you hit the torque it is set for.
Staking the Castle Nut
Once the castle nut is torqued, you may want to stake it in place. Staking is done to prevent the castle nut from accidentally backing out and potentially rendering the rifle unusable.
Staking is fairly simple. You use a good size punch to displace some metal from the backplate into the slot on the forward facing section of the castle nut. Yo should be able to easily do this with one strike of the hammer.
Install the Buffer and Buffer Spring
This step is fairly simple. You’ll start by installing the buffer spring in the buffer tube. You may have to push it a bit to get it past the buffer detent. Next, place the buffer into the spring. Make sure one of the flat spots is facing down toward the receiver. Push the buffer and spring into the tube. You may have to depress the detent slightly to get it in. One it is in, rotate the buffer so that a fully round part is behind the detent.
Installing the Front Pivot Pin
This is perhaps one of the easiest things to do yet the most unforgiving should you make a mistake. I say unforgiving because there’s a huge risk of the pin detent and spring shooting off into another dimension should you accidentally release it. In order to keep this risk to a minimum, I put a piece of carpet in front of the receiver. Should I accidentally release the detent and spring, the carpet should make a nice backstop to catch them.
Once the detent is in the socket you can slide the pin into the hole in the tab and pull the razor blade out. Now, simply twist the pin in its place until the detent clicks into the slot alongside the pin. Press the pin into place for now. This protects the tab that the pin is in from accidentally being broken or bent.
Getting it installed is fairly simple, place the spring in the detent hole in the front of the receiver. Using a pair of needle nose pliers, place the detent in front of the spring. You’ll use the actual detent spring to push the detent and spring fully into the receiver. While holding the detent with the pliers, push it into the socket with a razorblade.
Completing Your AR 15 Lower
Add a Stock of your choice
The last step is going to be to add a stock. If you are building a Pistol lower you will be probably be adding a brace of some kind. Although for pistol builds, leaving it with just a buffer tube is perfectly fine. If you are building a rifle, there are a number of stocks available. My preference is to use adjustable stocks but that is purely a personal preference. In either case, installing a stock or brace is similar for either.
The typical stock will slide on to the buffer tube. If it is an adjustable stock, you will find a mechanism on it to allow you to change the length of the stock. Start be sliding the stock on to the buffer tube until it starts. Next, pull the stock adjuster out so that the internal detent allows you to slide the stock on to the tube. Slide the Stock on and That’s it, you’ve completed your AR 15 Lower!
Wrapping It Up
I’ll be posting an article on building an upper for your AR 15 lower soon. In the meantime, make sure to visit our Amazon Storefront, The Armorer’s Bench for your Armory tools. Also, check my Armory page periodically for more firearms related content. Below are some Amazon affiliate links with some of the tools that would be useful to you for your AR builds.